












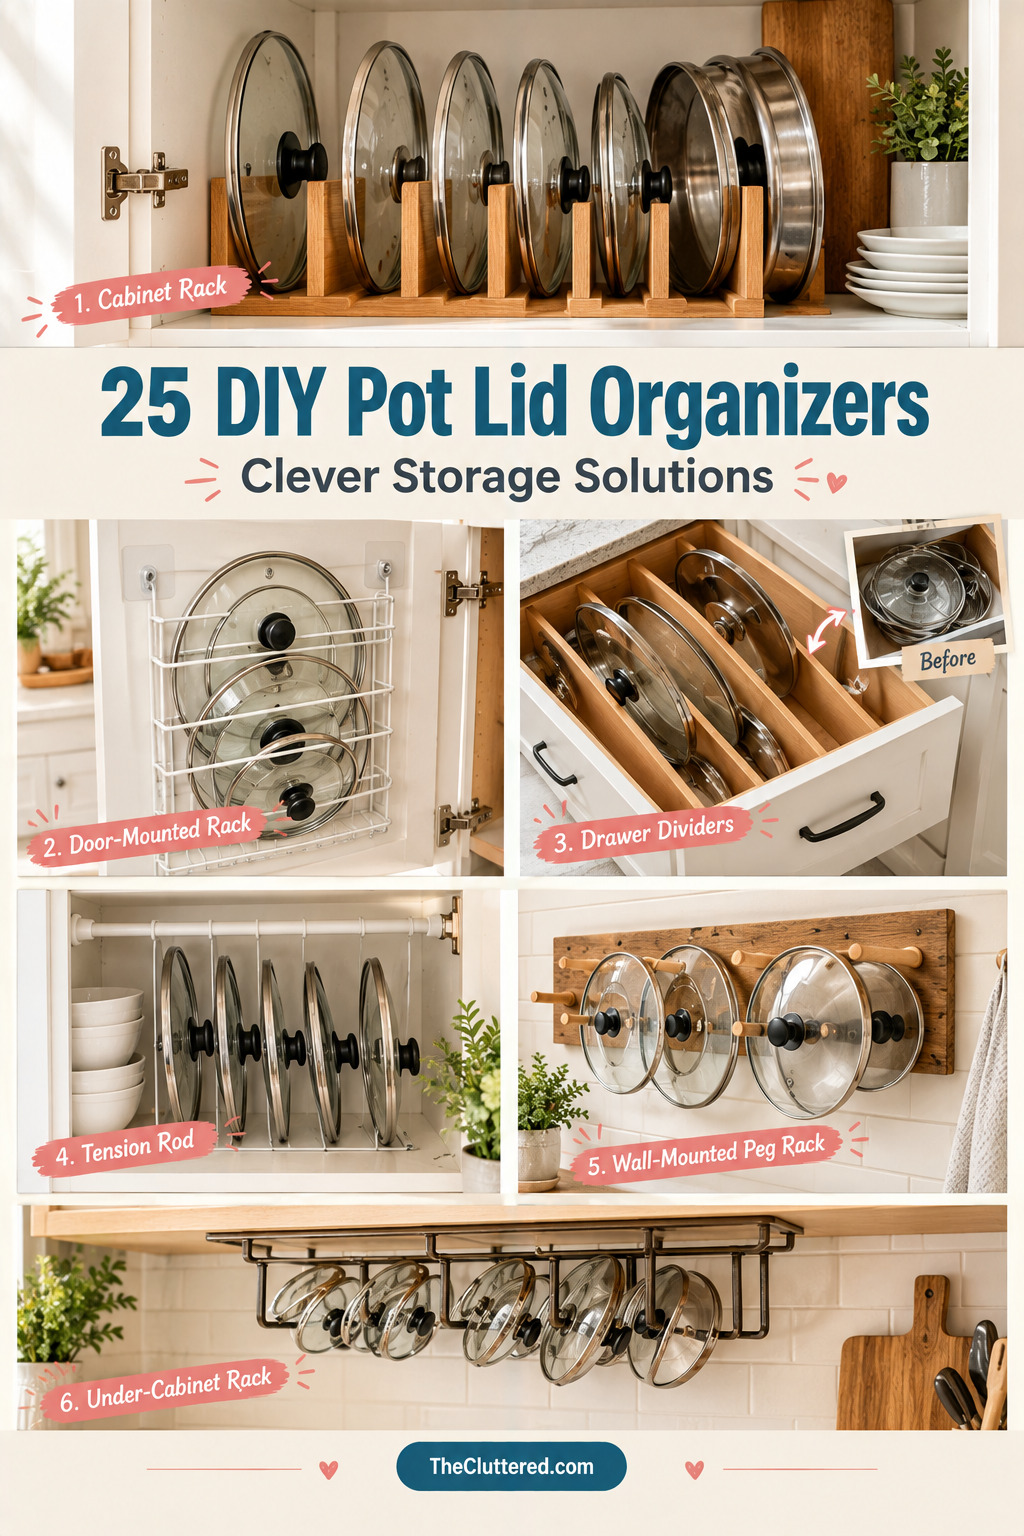


Opening your kitchen cabinet to find an avalanche of pot lids is one of those everyday frustrations that never gets easier. Whether you’re dealing with a cramped apartment kitchen or just trying to make better use of your cabinet space, finding a smart way to store pot lids can transform your cooking routine. The good news? You don’t need expensive organizers or a complete kitchen remodel to solve this problem.
DIY pot lid organizers are practical, budget-friendly solutions that you can create with basic materials and a little creativity. From simple tension rod setups to custom wooden racks, there’s an approach that fits every skill level, budget, and kitchen layout. These homemade storage solutions maximize vertical space, keep lids visible and accessible, and finally give you a place for every lid you own.
Quick Start: Choose Your Solution
For renters: Try no-drill options like adhesive hooks, tension rods, or over-the-door racks that won’t damage cabinets.
For small kitchens: Cabinet door organizers and vertical drawer dividers maximize every inch of space.
For DIY enthusiasts: Custom wooden racks and pegboard systems offer personalized storage that matches your style.
For quick fixes: Wire racks and repurposed file organizers can be installed in under 30 minutes.
Why DIY Pot Lid Storage Makes Sense
Store-bought pot lid organizers often come with limitations—they might be too small, too large, or just not quite right for your specific cabinet dimensions. When you create your own organizer, you control the size, configuration, and placement. You can design a solution that fits your exact collection of lids, from tiny saucepan covers to large Dutch oven tops.
Beyond customization, DIY solutions are typically more affordable than specialty kitchen organizers. Many projects use materials you already have or can find at dollar stores and hardware shops for just a few dollars. Plus, building your own organizer gives you the satisfaction of solving a problem with your own hands—something that feels especially rewarding in the kitchen.
Understanding Your Storage Options
Before diving into specific projects, it helps to understand the main categories of pot lid storage. Each approach has advantages depending on your kitchen layout and cooking habits.
Cabinet Door Storage
Mounting organizers on the inside of cabinet doors is one of the most popular strategies because it uses otherwise wasted space. This keeps lids visible when you open the cabinet and doesn’t占用 valuable shelf space. Door-mounted solutions work well with wire racks, wooden slats, or even repurposed magazine holders.
Drawer Dividers
If you have deep drawers in your kitchen, creating vertical dividers transforms them into efficient lid storage. This approach keeps lids flat and organized, making it easy to grab the size you need without digging through a jumbled pile. Wooden dividers are sturdy and customizable, while adjustable plastic options offer flexibility.
Vertical Cabinet Racks
Installing a rack inside a cabinet allows lids to stand vertically, similar to how records are stored. This makes every lid visible and accessible without stacking. Tension rods, wooden dowels, or custom-built racks all work for this approach.
Wall-Mounted Solutions
For kitchens with limited cabinet space, wall-mounted racks or pegboards keep lids accessible while freeing up cabinet real estate. This works especially well in farmhouse-style kitchens where open storage is part of the aesthetic.
Under-Cabinet Storage
Mounting racks underneath cabinets utilizes that often-overlooked space. This keeps lids handy near your cooking area while maintaining a clean countertop appearance.
Essential Materials for DIY Pot Lid Organizers
Most DIY pot lid organizers require basic materials that are easy to find and affordable. Here’s what you’ll commonly need:
- Wood boards or dowels – For custom racks and dividers (1×2 or 1×3 lumber works well)
- Wire racks or baskets – Available at dollar stores or hardware shops
- Tension rods – Adjustable rods that require no drilling
- Adhesive hooks or brackets – Command strips and removable mounting options for renters
- Screws and drill – For permanent installations
- Measuring tape – Critical for getting dimensions right
- Sandpaper – To smooth rough wood edges
- Wood stain or paint – Optional, for finishing touches
Measuring and Planning Your Project
Success with any DIY organizer starts with accurate measurements. Before buying materials or cutting wood, measure:
- The width, depth, and height of your cabinet or drawer
- The diameter of your largest pot lid
- The thickness of your thickest lid (including the handle)
- How many lids you need to store
Leave at least 1-2 inches of clearance on each side of your organizer to ensure easy installation and removal. If you’re building dividers, space them about 1.5 to 2 inches apart to accommodate most standard lids while preventing them from sliding around.
Installation Tips for Different Cabinet Types
For standard cabinets: Most door-mounted solutions work well with standard 3/4-inch thick cabinet doors. Use screws that are long enough to hold securely but not so long they poke through the other side.
For thin or hollow-core doors: Use toggle bolts or specialized hollow-door anchors to ensure your organizer stays secure. Alternatively, opt for adhesive solutions that don’t require drilling.
For deep drawers: Measure the drawer depth carefully and build dividers that stop about 1 inch short of the drawer front to allow smooth opening and closing.
For corner cabinets: Consider angled or L-shaped organizers that make use of the awkward corner space efficiently.
Maintaining Your DIY Organizer
Once your pot lid organizer is installed, a little maintenance keeps it functioning well:
- Wipe down wooden organizers occasionally to prevent moisture buildup
- Check adhesive hooks periodically and replace if they start to loosen
- Tighten any loose screws every few months
- Reorganize seasonally if your cookware collection changes
- Clean lids before storing to prevent grease buildup on your organizer
Troubleshooting Common Issues
Lids won’t fit: If your lids are too thick for the slots you created, you may need to widen the spacing or use a different organizer style. Vertical racks typically accommodate thicker lids better than horizontal dividers.
Organizer feels unstable: Add additional support brackets or use stronger adhesive. For door-mounted solutions, ensure you’re using appropriate hardware for your door type.
Lids slide around: Add rubber bumpers or felt pads to the bottom of slots to create friction and keep lids in place.
Not enough space: Consider using multiple storage methods—some lids on the door, some in a drawer, and larger lids stored vertically in a cabinet.
Budget-Friendly Material Alternatives
You don’t need to spend much to create effective pot lid storage. Here are some money-saving alternatives:
- Repurposed file organizers: Metal or plastic file holders from office supply stores work perfectly for storing lids vertically
- PVC pipe sections: Cut into rings and mounted on a board, these create custom-sized slots
- Old picture frames: Remove the glass and use the frame as a shallow rack
- Scrap wood: Check with local lumber yards for free or cheap scrap pieces
- Wire shelving: Cut to size from old shelving units or purchase small sections
Customizing for Your Kitchen Style
Your DIY organizer doesn’t have to be purely functional—it can complement your kitchen’s aesthetic too. For farmhouse kitchens, use natural or stained wood with visible grain. Modern kitchens benefit from sleek metal racks or painted white organizers. Rustic spaces look great with reclaimed wood or distressed finishes. The key is choosing materials and finishes that feel cohesive with your existing decor.
Safety Considerations
When building and installing your organizer, keep safety in mind:
- Always wear eye protection when drilling or cutting
- Sand all wood edges thoroughly to prevent splinters
- Ensure door-mounted organizers don’t interfere with cabinet closure
- Don’t overload organizers beyond their weight capacity
- Use appropriate anchors for your wall or cabinet type
- Keep heavy lids on lower shelves to prevent tipping
Making the Most of Small Kitchen Spaces
Small kitchens require creative thinking, but they can actually benefit the most from DIY pot lid organizers. Every inch counts when you’re working with limited space. Consider these strategies:
Stack your storage: Use both the cabinet door AND the interior shelf space. Mount a rack on the door and keep frequently-used lids there, while storing seasonal or specialty lids inside the cabinet.
Go vertical: Floor-to-ceiling storage isn’t just for pantries. Use the full height of your cabinets by installing multiple tension rods or building a tall, narrow rack.
Think outside the cabinet: If cabinet space is truly limited, consider wall-mounted solutions, over-the-refrigerator storage, or even a rolling cart with built-in lid storage.
Renter-Friendly Solutions
If you’re renting, you need solutions that won’t damage the property or violate your lease. Fortunately, many effective pot lid organizers require no drilling or permanent installation:
- Command strips and hooks: Modern adhesive technology can hold surprising weight when applied correctly
- Tension rods: These require zero installation and can be removed without a trace
- Freestanding organizers: Place a small rack or divider system inside cabinets without attaching anything
- Over-the-door racks: These hook over the top of cabinet doors with no mounting required
- Drawer inserts: Simply place dividers in drawers—no attachment needed
Always test adhesive products in an inconspicuous area first, and follow removal instructions carefully when it’s time to move.
Organizing Lids by Type and Size
Once you’ve built your organizer, think strategically about how you arrange your lids. Grouping them thoughtfully makes your kitchen more functional:
- By size: Keep small, medium, and large lids in separate sections for quick identification
- By frequency of use: Store everyday lids in the most accessible spots
- By pot type: Keep saucepan lids together, Dutch oven lids together, etc.
- By material: Separate glass lids from metal lids if you prefer
Consider labeling sections if you have a large collection, especially if multiple people use the kitchen.
Expanding Beyond Pot Lids
Many DIY pot lid organizers can serve double duty. Once you’ve mastered lid storage, consider using similar solutions for:
- Cutting boards
- Baking sheets and cooling racks
- Serving platters
- Cast iron skillets
- Tupperware lids
- Large mixing bowls
The principles are the same—vertical storage, dividers, and maximizing unused space work for many kitchen items beyond just pot lids.
When to Choose DIY vs. Store-Bought
While DIY solutions offer customization and cost savings, there are times when buying an organizer makes more sense:
Choose DIY when:
- You have unusual cabinet dimensions
- You enjoy hands-on projects
- You’re on a tight budget
- You want a specific aesthetic
- You have the necessary tools and materials
Consider store-bought when:
- You need a solution immediately
- You lack tools or DIY confidence
- Standard sizes fit your space perfectly
- You prefer warranty or return options
Many people find a hybrid approach works best—DIY for custom areas and store-bought for standard spaces.
Quick Reference: Project Difficulty & Time
| Project Type | Difficulty | Time Required | Tools Needed |
|---|---|---|---|
| Tension rod organizer | Easy | 10 minutes | None |
| Adhesive hook rack | Easy | 20 minutes (plus drying time) | None |
| Wire rack door mount | Easy-Medium | 30 minutes | Screwdriver |
| Drawer dividers | Medium | 1-2 hours | Saw, measuring tape, sandpaper |
| Custom wooden rack | Medium-Hard | 2-4 hours | Saw, drill, sander, measuring tape |
| Pegboard system | Medium | 1-2 hours | Drill, saw, measuring tape |
Common Mistakes to Avoid
Learning from others’ experiences can save you time and frustration. Here are pitfalls to watch out for:
- Not measuring twice: Always verify measurements before cutting or purchasing materials
- Ignoring lid handles: Remember that handles add thickness—measure the thickest part
- Overloading door mounts: Cabinet doors have weight limits; don’t exceed them
- Forgetting clearance: Leave room for the cabinet to close fully
- Skipping sanding: Rough wood edges can damage lids and your hands
- Making slots too tight: Lids should slide in and out easily, not require force
- Using weak adhesives: If using adhesive hooks, choose ones rated for the weight
Getting Started: Your First DIY Pot Lid Organizer
If you’re new to DIY projects, start simple. A tension rod organizer or adhesive hook system requires minimal tools and investment while still providing real organization benefits. As you gain confidence, you can tackle more complex projects like custom wooden racks or drawer dividers.
Remember, the best organizer is the one you’ll actually use. Choose a solution that fits your skill level, budget, and kitchen layout. Even a basic DIY project can transform your cooking experience by eliminating the daily frustration of searching for the right lid.
Final Thoughts on DIY Pot Lid Storage
Organizing pot lids doesn’t require expensive systems or professional help. With a little planning, basic materials, and the approach that fits your space, you can create a storage solution that works beautifully for your kitchen. Whether you choose a simple tension rod setup or build an elaborate custom rack, the result will be the same: a more functional, less frustrating kitchen where every lid has its place.
The beauty of DIY solutions is their flexibility. If your first attempt isn’t perfect, you can adjust, modify, or start fresh without much cost or waste. Each project teaches you something new about your space and your organizational needs. So gather your materials, measure your space, and take the first step toward a clutter-free cabinet.
FAQ
What’s the easiest DIY pot lid organizer for beginners?
Tension rods are the simplest solution—just measure your cabinet width, purchase adjustable tension rods, and install them vertically to create slots for your lids. No tools required, and they’re completely removable, making them perfect for renters.
How do I measure for a custom pot lid organizer?
Measure the width and depth of your cabinet or drawer, then measure the diameter of your largest lid and the thickness of your thickest lid (including the handle). Space dividers 1.5 to 2 inches apart to accommodate most standard lids while allowing easy access.
Can I organize pot lids without drilling holes?
Absolutely! Tension rods, adhesive hooks (like Command strips), over-the-door racks, and freestanding organizers all work without drilling. These options are ideal for renters or anyone who wants a non-permanent solution.
What’s the best way to store large pot lids?
Large lids work best in vertical storage systems like cabinet door racks or deep drawer dividers. Avoid stacking them horizontally, as this makes it difficult to access lids at the bottom and can cause scratching.
How many lids can a typical DIY organizer hold?
This varies by design, but a standard cabinet door rack typically holds 6-10 lids, while a deep drawer with dividers can store 10-15 lids. The key is measuring your space and lid collection before building to ensure adequate capacity.
Simple Wooden Door-Mounted Rack

Source: Fix This Build That
This clean, straightforward wooden rack attaches to the inside of a cabinet door, creating vertical slots that hold multiple pot lids in an organized, visible arrangement. The natural wood finish complements farmhouse and traditional kitchens while the simple construction makes it an achievable weekend project.
The beauty of this design lies in its simplicity—basic 1×2 or 1×3 lumber cut to size and assembled with wood glue and screws creates a sturdy organizer that keeps lids easily accessible without占用 valuable shelf space. The vertical orientation means you can see every lid at a glance.
To adapt this for your kitchen, measure your cabinet door and lid collection carefully. You can adjust the width between slots to accommodate larger or smaller lids, and stain or paint the wood to match your existing cabinetry. For renters, consider using removable adhesive strips instead of screws.
Tension Rod Vertical Divider System

Source: Cleaning Picks
This clever solution uses adjustable tension rods positioned vertically inside a cabinet to create custom-sized compartments for pot lids. The rods press firmly between the cabinet sides, requiring no drilling, screws, or permanent installation whatsoever.
The simplicity is remarkable—you can install this system in under five minutes, adjust the spacing as your lid collection changes, and remove it completely when needed without leaving any marks. It’s an ideal solution for renters, temporary living situations, or anyone who wants flexibility in their organization.
Customize this approach by using multiple rods to create narrower or wider slots based on your specific lids. You can also combine this with other tension rod solutions in the same cabinet for comprehensive organization. The only limitation is your cabinet width and the maximum extension of your tension rods.
Custom Wooden Drawer Divider System

Source: Pine and Poplar
This sophisticated solution transforms a deep kitchen drawer into a highly organized storage system with custom-cut wooden dividers that create individual slots for pots, pans, and lids. Each piece of cookware has its own designated space, eliminating the frustrating pile-up that typically occurs in deep drawers.
Building this organizer requires basic woodworking skills and tools—a saw, measuring tape, and sandpaper are essential. The dividers are cut to fit your specific drawer dimensions and lid sizes, then secured with wood glue or small brackets. The result looks professionally installed and functions beautifully for years.
To personalize this project, measure your drawer interior and your largest cookware pieces carefully. You can create a mix of wider slots for large pots and narrower ones for lids, or dedicate an entire drawer just to lid storage. Finish the wood to match your cabinetry or leave it natural for a rustic look.
Budget-Friendly Wire Rack Solution

Source: AllMomDoes
This resourceful approach repurposes inexpensive wire racks—often found at dollar stores or discount retailers—into effective pot lid organizers. The racks, originally designed for other purposes, have perfectly spaced wires that naturally hold pot lids in an upright, organized position.
The appeal of this solution is its accessibility and affordability. You can implement it immediately with a quick shopping trip and zero construction skills. Simply place the rack in a cabinet or mount it to a door using adhesive strips or small brackets. The total cost is typically under ten dollars.
Adapt this idea by shopping your home first—old dish racks, file organizers, or even magazine holders might work just as well. If the rack doesn’t fit perfectly, you can often bend or adjust the wires slightly. This is an excellent starter project for anyone wanting to organize their kitchen without a significant investment.
Wall-Mounted Pegboard Lid Rack

Source: Hometalk
This charming wall-mounted solution uses a wooden board with dowels or pegs to create a vertical storage system that keeps pot lids visible and accessible while freeing up valuable cabinet space. The design works particularly well in farmhouse-style kitchens where open storage is part of the aesthetic.
Construction is straightforward: cut a board to your desired length, drill holes at regular intervals, and insert wooden dowels secured with wood glue. Mount the board to the wall using appropriate brackets or French cleats for heavier loads. The entire project can be completed in an afternoon.
Customize this organizer by staining or painting the wood to match your kitchen decor, adjusting the dowel spacing for your specific lids, or adding a small shelf at the bottom for additional storage. You can also expand the system to hold other kitchen items like cutting boards or utensils, creating a multi-functional wall organization station.
Simple Cabinet Shelf Rack Insert

Source: The Owner Builder Network
This freestanding wooden rack sits directly on a cabinet shelf, creating vertical storage slots for pot lids without requiring any mounting or installation. The simple design uses basic lumber cut into a frame with dividers, creating a stable organizer that can be repositioned as needed.
The beauty of this approach is its flexibility—you can move the rack to different cabinets, adjust its position seasonally, or remove it entirely without leaving any marks. It’s perfect for people who like to rearrange their kitchen organization or who aren’t comfortable with more permanent installations.
To build this organizer, measure your cabinet shelf depth and height, then cut lumber to create a rectangular frame with vertical dividers. Sand all edges smooth and optionally apply a finish. The rack should be tall enough to hold your largest lid but short enough to allow the cabinet door to close easily. This is an excellent beginner woodworking project.
Adhesive Hook Cabinet Door Organizer

Source: Medium
This ultra-simple solution uses adhesive hooks mounted to the inside of a cabinet door to hang pot lids by their handles. The method requires zero tools, takes just minutes to implement, and can be completely removed without damaging the cabinet—making it perfect for renters or anyone seeking a non-permanent solution.
The key to success is choosing quality adhesive hooks rated for the weight of your lids and following the application instructions carefully. Clean the door surface thoroughly, apply the hooks, and allow the adhesive to cure for the recommended time before hanging lids. Space the hooks to prevent lids from overlapping.
This approach works best with lids that have prominent handles or knobs. If your lids have small or awkward handles, consider combining this method with other solutions. You can also use this technique in pantry doors, under-sink cabinets, or anywhere you need quick lid access without占用 shelf space.
Under-Cabinet Mounted Rack System

Source: Amazon
This clever installation mounts a rack system underneath upper cabinets, utilizing that frequently overlooked space to store pot lids vertically. The lids remain hidden from view when not in use but are easily accessible when you’re cooking, keeping them close to your stovetop without占用 counter or cabinet shelf space.
Installation typically requires drilling pilot holes into the cabinet bottom and using screws to secure mounting brackets. The rack itself can be a purchased organizer or a DIY wooden or metal frame. Make sure to measure the clearance carefully—you need enough space for your tallest lid plus room for the mounting hardware.
This solution works particularly well in kitchens with limited cabinet space or for people who prefer minimalist countertops. You can install multiple racks side-by-side for larger lid collections, or combine this with other under-cabinet storage solutions like spice racks or utensil holders for a comprehensive organization system.
Repurposed File Holder Vertical Storage

Source: The Kitchn
This ingenious hack repurposes metal or plastic file organizers—commonly found in office supply stores—into instant pot lid storage. The vertical slots designed for file folders are perfectly sized to hold pot lids upright, creating an organized system with zero construction or installation required.
Simply purchase a file organizer in a size that fits your cabinet or countertop, place it in your desired location, and start arranging your lids. The entire process takes less than five minutes and costs typically between $5-15 depending on the organizer size and material. You can find options in various colors to match your kitchen aesthetic.
Maximize this solution by using multiple organizers side-by-side for larger lid collections, or dedicate different organizers to different lid sizes. The portable nature means you can easily reposition or remove the organizer as your needs change. This is an excellent option for anyone who wants immediate organization without any DIY work.
PVC Pipe Custom Slot Organizer

Source: Civil Jungle
This creative approach uses sections of PVC pipe cut into rings and mounted on a wooden board to create custom-sized slots for individual pot lids. Each ring can be sized precisely to fit a specific lid, creating a tailored organization system that accommodates your exact collection.
To build this organizer, measure the diameter of each lid, cut PVC pipe sections slightly larger than those measurements, sand the edges smooth, and arrange them on a board in your preferred layout. Secure the rings with adhesive or screws, then mount the board in a cabinet or on a wall. You can paint the PVC to match your decor or leave it white for a clean look.
This solution is particularly useful if you have an eclectic mix of lid sizes that don’t fit standard organizer spacing. The modular nature means you can add more rings as your collection grows or rearrange them to optimize space. It’s also surprisingly affordable—PVC pipe is inexpensive and widely available at hardware stores.
Magazine Rack Door-Mounted Solution

Source: Cleaning Picks
This practical solution repurposes a standard magazine rack—either wire or wooden—by mounting it to the inside of a cabinet door to hold pot lids vertically. The rack’s natural compartment design is perfectly suited for organizing lids of various sizes, and installation is straightforward.
Mount the rack using small screws, adhesive strips, or even heavy-duty velcro, depending on your cabinet type and whether you need a permanent or removable solution. Position it at a comfortable height for easy access, and ensure there’s enough clearance for the cabinet door to close fully with lids in place.
This approach works well because magazine racks are widely available, affordable, and come in various styles to match different kitchen aesthetics. You can find options at dollar stores, office supply shops, or home organization sections. If you already have a magazine rack you’re not using, this is an instant, free organization solution.
Custom Pull-Out Drawer Organizer

Source: Family Handyman
This advanced DIY project creates a custom pull-out drawer system with built-in dividers specifically designed for organizing pots, pans, and lids. The pull-out mechanism provides easy access to items stored in deep cabinets, eliminating the need to reach awkwardly or dig through stacked cookware.
Building this organizer requires intermediate to advanced woodworking skills and access to drawer slide hardware. You’ll construct a box that fits your cabinet dimensions, install smooth-operating drawer slides, and create custom dividers inside the drawer to keep everything organized. The result rivals professional kitchen installations.
While this is a more complex project, the functionality it provides is exceptional. You can customize the divider configuration to match your exact cookware collection, and the pull-out action makes accessing heavy pots and lids much easier. This is an excellent investment of time for anyone who cooks frequently and wants professional-level organization.
Hanging Hook Wall Display

Source: TipHero
This creative approach uses hangers, hooks, or a combination of both to hang pot lids vertically on a wall or inside a cabinet. The method transforms storage into a visual display, keeping lids easily accessible while adding an element of kitchen decor. It’s particularly effective in farmhouse or industrial-style kitchens.
Install a series of sturdy hooks on a wall, backsplash, or inside a cabinet door, then hang lids by their handles or knobs. You can use traditional cup hooks, decorative wall hooks, or even repurpose coat hangers by bending them into custom shapes. Space the hooks to prevent lids from overlapping.
This solution works best when you have lids with attractive handles or interesting designs that you don’t mind displaying. It’s also highly flexible—you can easily rearrange hooks as your collection changes or add more hooks when needed. Consider combining this with other wall storage for a comprehensive open-organization system.
Decorative Basket Vertical Storage

Source: Civil Jungle
This charming solution uses decorative baskets—woven, wire, or metal—to store pot lids vertically on open shelves, countertops, or inside cabinets. The approach combines practical organization with aesthetic appeal, turning a functional necessity into an attractive kitchen design element.
Choose baskets that are tall enough to accommodate your largest lids and wide enough to hold several lids comfortably. Position them on open shelving for easy access and visual interest, or tuck them into cabinets for a more concealed look. The natural materials add warmth and texture to your kitchen space.
This method is highly flexible and requires no installation whatsoever. You can move baskets around as needed, swap them out seasonally, or use different baskets for different lid sizes. It’s an excellent option for renters or anyone who prefers non-permanent, decorative organization solutions that double as decor.
Expandable Rack Custom Fit System

Source: Useful DIY Projects
This versatile solution uses expandable racks—similar to those used for plates or dish organization—that adjust in width to fit your specific cabinet dimensions perfectly. The racks feature spring-loaded or sliding mechanisms that allow them to expand and contract, creating a custom fit without any cutting or construction.
Simply measure your cabinet width, purchase an expandable rack that covers that range, adjust it to fit snugly, and place it in your cabinet. The rack creates vertical slots that hold pot lids securely while allowing easy removal. Many expandable racks are designed specifically for cookware organization.
The adjustability makes this solution incredibly versatile—you can use the same rack in different cabinets as your needs change, or adjust it seasonally if you rotate cookware. It’s also portable, making it easy to remove for cleaning or reorganization. This is an excellent middle-ground between DIY construction and buying fixed-size organizers.
Corner Cabinet Lazy Susan Solution

Source: Craftsy Hacks
This smart solution transforms awkward corner cabinet space into functional pot lid storage using a Lazy Susan turntable. The rotating platform makes lids stored in the back of deep corner cabinets easily accessible, solving one of the most frustrating kitchen storage challenges.
Install a Lazy Susan sized to fit your corner cabinet—options range from simple plastic turntables to more sophisticated two-tier metal systems. Arrange pot lids vertically around the perimeter, either standing on their own or in small dividers. A quick spin brings any lid to the front for easy access.
This approach maximizes otherwise difficult-to-use space and works particularly well in kitchens where corner cabinets are common but often underutilized. You can combine the Lazy Susan with other corner cabinet organizers for comprehensive storage. It’s an excellent solution for anyone looking to make every inch of their kitchen functional.
Slatted Wood Custom Rack

Source: DIY Joy
This beautiful custom solution uses slatted wood construction to create a rack with perfectly spaced vertical slots for pot lids. The design allows you to customize every dimension—from overall size to slot width—ensuring a perfect fit for your specific lid collection and cabinet space.
Build this organizer by cutting a base board to your desired dimensions, then cutting multiple thin wood slats to create dividers. Attach the slats perpendicular to the base using wood glue and nails or screws, spacing them to accommodate your lids. Sand thoroughly and apply your preferred finish.
The slatted design is both functional and attractive, with the natural wood grain adding warmth to your kitchen. You can build it as a freestanding unit for shelf placement or add mounting hardware for wall or door installation. This project is ideal for intermediate DIYers who want a professional-looking, personalized solution.
Tiered Shelf Multi-Level Organizer

Source: Offbeat Bros
This efficient solution uses tiered shelving—either purchased or DIY-built—to organize pot lids at multiple levels within a cabinet. The stepped design allows you to see and access every lid easily while maximizing vertical space that would otherwise go unused.
You can purchase tiered organizers designed for kitchen use or build your own using wood boards cut to different lengths and stacked with spacers. Arrange lids vertically on each tier, grouping by size or frequency of use. The tiered approach prevents smaller lids from getting lost behind larger ones.
This method works particularly well in deep cabinets where single-level storage leaves significant wasted space above. It’s also adaptable—you can adjust tier heights based on your lid sizes or add/remove tiers as your collection changes. Consider this approach if you have a large lid collection and limited cabinet space.
Command Strip Mounted Rack System

Source: We’re Adulting
This renter-friendly solution uses Command strips or similar damage-free adhesive products to mount lightweight racks for pot lid storage. The method provides secure holding power without drilling holes, making it perfect for apartments, rentals, or anyone who wants flexible, non-permanent organization.
Choose Command strips rated for the weight of your rack plus lids, clean the mounting surface thoroughly, apply the strips according to package directions, and allow proper curing time before loading with lids. The strips can be removed later without damaging cabinet surfaces when you’re ready to move or reorganize.
This approach works best with lightweight wire or plastic racks and moderate numbers of lids. For heavier collections, use multiple strips or combine with other mounting methods. Always test the installation gradually, adding lids one at a time to ensure the adhesive holds securely. It’s an excellent solution for temporary or flexible organization needs.
Hanging Wire Basket Under-Shelf Storage

Source: Love Create Celebrate
This clever solution uses wire baskets that hang underneath existing cabinet shelves, creating additional storage space for pot lids without占用 the main shelf area. The baskets hook over the shelf edge, utilizing vertical space that typically goes unused in standard cabinets.
Purchase under-shelf baskets designed for kitchen organization or repurpose small wire baskets with hooks. Position them strategically to hold pot lids vertically, ensuring there’s enough clearance for the cabinet door to close. The baskets are easily removable and repositionable as your needs change.
This approach is particularly effective in cabinets with significant vertical space between shelves. You can install multiple baskets at different heights or combine them with other under-shelf organizers for comprehensive storage. It’s a simple, affordable solution that requires no installation tools and provides immediate organization benefits.
Wooden Dowel Vertical Rack

Source: Hometalk
This straightforward DIY solution uses wooden dowels inserted into a board to create custom vertical slots for pot lids. The natural wood aesthetic works well in farmhouse, rustic, or traditional kitchens, and the construction requires only basic tools and materials.
Drill holes in a wood board at your desired spacing, cut wooden dowels to length, and insert them with wood glue to create pegs that hold lids vertically. You can mount the board on a wall, inside a cabinet, or leave it freestanding on a shelf. Sand and finish the wood to match your kitchen decor.
The dowel spacing is completely customizable, allowing you to accommodate lids of various sizes. You can also adjust the dowel height based on your largest lid. This is an excellent beginner-friendly project that produces professional-looking results with minimal investment in materials or tools.
Stackable Modular Organizer System

Source: Fizzy Flare
This flexible solution uses stackable, modular organizers that can be arranged, rearranged, and expanded as your pot lid collection grows. The system typically consists of individual units that interlock or stack securely, allowing you to create a custom configuration that fits your specific cabinet dimensions and storage needs.
Purchase modular organizers designed for kitchen use or create your own using uniform containers or bins. Arrange them vertically, horizontally, or in combinations to maximize your available space. The modular nature means you can add more units when needed or reconfigure the system if you change cabinets.
This approach is ideal for people who anticipate their storage needs changing over time, or for those who like the ability to reorganize easily. It’s also practical for renters who may need to adapt their organization system to different kitchen layouts. The scalability makes it a long-term solution that grows with your needs.
Hanging Fabric Pocket Organizer

Source: Etsy
This gentle storage solution uses fabric pocket organizers—similar to shoe organizers or jewelry holders—that hang on cabinet doors to store pot lids in individual soft pockets. The fabric construction protects lids from scratches while the hanging design maximizes door space efficiently.
Purchase a fabric organizer with pocket sizes appropriate for your lids, or sew a custom version using sturdy cotton or canvas. Hang it on the inside of a cabinet door using the built-in hooks or adhesive strips. Each pocket holds one or two lids vertically, keeping them organized and easily accessible.
This approach is particularly useful for protecting delicate glass lids or lids with special finishes that might scratch against hard organizers. The fabric is also quieter than metal or wood when removing lids. It’s an excellent choice for anyone seeking a soft, decorative storage solution that’s gentle on cookware.
Pegboard Custom Hook System
Source: Useful DIY Projects
This highly customizable solution uses pegboard panels with adjustable hooks to create a pot lid storage system that can be reconfigured endlessly. The pegboard can be mounted inside cabinets, on walls, or on cabinet doors, providing versatile mounting options for any kitchen layout.
Install pegboard using appropriate mounting hardware, then add hooks at positions that accommodate your lid sizes and quantities. Use standard pegboard hooks, specialty kitchen hooks, or even S-hooks to hang lids by their handles. The beauty of this system is that you can move hooks anytime your needs change.
This approach is perfect for people who like to experiment with different organization configurations or whose lid collections change frequently. You can also expand the system to hold other kitchen items like utensils, measuring cups, or small appliances, creating a comprehensive organization station. It’s practical, adaptable, and endlessly customizable.
Rolling Cart Mobile Storage Station

Source: The Kitchn
This versatile solution uses a rolling kitchen cart equipped with shelves, dividers, or baskets to create mobile pot lid storage that can be positioned wherever it’s most useful. The cart can be rolled near the stove while cooking, tucked away when not needed, or moved entirely if you rearrange your kitchen.
Purchase a kitchen cart with appropriate shelving or modify an existing cart by adding dividers, baskets, or racks to create dedicated lid storage. Organize lids vertically on shelves, in baskets, or using any of the other methods described in this article. Add casters if the cart doesn’t already have them for easy mobility.
This approach is ideal for kitchens with limited built-in storage or for people who like flexible organization that adapts to their cooking workflow. The cart can serve multiple purposes—storing lids, holding prep ingredients, or providing extra counter space—making it a highly functional addition to any kitchen. It’s also perfect for renters who can’t modify permanent cabinetry.
Love these ideas? Follow @theclutteredblog on Pinterest for more cozy, practical gift inspiration!