












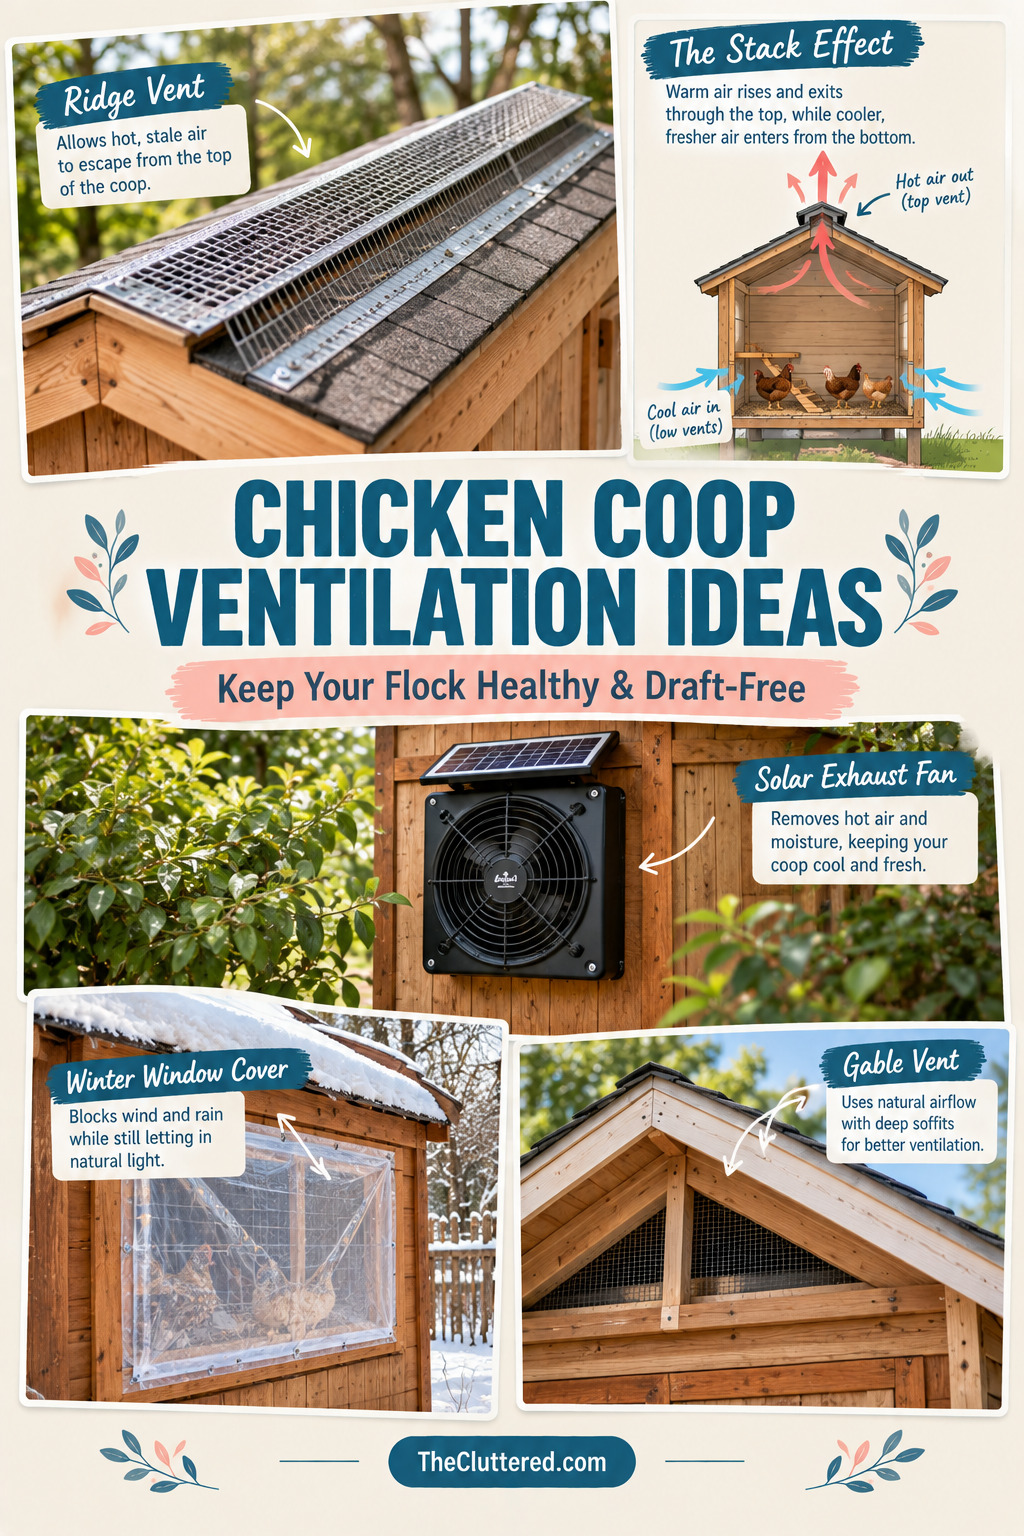
Building a secure, predator-proof chicken coop is only half the battle. The invisible factor that truly determines whether your flock thrives or merely survives is airflow. Proper chicken coop ventilation ideas are essential for removing dangerous ammonia fumes, preventing deadly moisture buildup, and keeping your birds comfortable through extreme summer heat and freezing winter nights.
If you have ever stepped into a coop and been hit by a wall of stale, humid air, you already know why this matters. This guide breaks down the science of coop airflow, shares practical DIY solutions, and showcases 25 real-world inspiration ideas to help you build a healthier environment for your backyard flock.
Quick Start: Choose Your Ventilation Strategy
- Hot Climates / Summer: Focus on cross-breeze windows, solar exhaust fans, and deep roof overhangs to maximize air exchange and shade.
- Cold Climates / Winter: Focus on ridge vents and high soffits. The goal is to let moisture escape above the roost while blocking direct wind drafts at bird level.
- Small Backyard Coops: Utilize passive stack effect vents and hardware cloth-covered gable windows to maintain airflow without sacrificing security.
The Science of Coop Airflow
Chickens are incredibly resilient to cold, but they are highly vulnerable to poor air quality. A single bird exhales a surprising amount of moisture every day. When that moisture combines with droppings in an enclosed space, it creates ammonia gas. Without adequate airflow, this gas accumulates at roost level, leading to respiratory infections, frostbite on combs, and severe stress.
Moisture vs. Temperature
The biggest mistake new keepers make is sealing the coop tightly in winter to “keep the heat in.” In reality, trapped moisture is far more dangerous than cold air. When warm, moist air from the birds hits cold interior walls, it condenses. This damp environment is a breeding ground for mold and frostbite. Proper ventilation removes the moisture while allowing the birds to retain their natural body heat.
The Golden Rule: Vent High, Block Drafts Low
The most effective chicken coop ventilation ideas rely on a simple principle of physics: warm air rises. By placing your exhaust vents near the roof peak or under the eaves, you allow the warm, moisture-laden air to escape naturally. Meanwhile, solid walls at the lower level protect the roosting birds from direct wind drafts.
This creates a continuous, gentle exchange of air. Fresh, cool air enters through low soffits or protected wall vents, mixes slowly through the coop, and exits at the top, carrying ammonia and humidity with it. The birds stay warm and dry, completely unaffected by the airflow happening above their heads.
Passive vs. Active Ventilation
The Passive Stack Effect
Passive ventilation requires no electricity and no moving parts. By combining low intake vents (protected by hardware cloth) with a high exhaust vent or small chimney, you create a thermal siphon. This “stack effect” works 24/7, silently pulling fresh air in and pushing stale air out. It is the most reliable method for year-round health.
Active Ventilation (Fans)
In extreme summer heat, passive airflow might not be enough. Solar-powered exhaust fans are a fantastic addition for hot climates. They actively pull hot air out of the coop, reducing the internal temperature significantly. However, fans should supplement—not replace—passive ventilation, and they must be kept clean to avoid the dangerous dust accumulation seen in poorly maintained coops.
Predator-Proofing Your Vents
Every open vent is a potential entry point for raccoons, rats, and weasels. The golden rule of coop security is to cover every single opening with galvanized hardware cloth (1/2 inch mesh or smaller). Chicken wire is not sufficient; it is too flimsy and predators can easily rip through it. Secure the hardware cloth with washers and screws, not just staples, to ensure it withstands determined predators and harsh weather.
Practical Application: Auditing Your Coop
Before adding new vents, spend time observing your current setup. Stand inside the coop at roost height on a windy day. If you feel air blowing directly on you, you have a draft that needs to be blocked. Next, smell the air. If it stings your eyes or smells heavily of ammonia, your exhaust ventilation is insufficient. Finally, check the upper corners of the ceiling for condensation or mold—these are clear signs that moist air is not escaping properly.
The Ultimate Coop Ventilation Checklist
- Install ridge vents or roof turbines along the peak of the roof.
- Add soffits under the eaves to allow cool air intake.
- Ensure all vents are covered with 1/2 inch galvanized hardware cloth.
- Verify that no direct drafts hit the roosting bars.
- Install gable vents on opposite walls for summer cross-breeze.
- Use removable plexiglass or plastic sheeting for winter window management.
- Position roosts higher than the lowest intake vents.
- Consider a solar exhaust fan for extreme summer heat.
- Check for condensation on interior walls after cold nights.
- Ensure the deep litter method is active to help manage ammonia at the floor level.
- Seal gaps around doors and windows to prevent unpredictable winter drafts.
- Clean fan blades and solar panels monthly during active use.
- Verify that overhangs protect upper vents from driving rain and snow.
- Monitor flock health for signs of respiratory distress or frostbite.
- Adjust vent covers seasonally based on weather forecasts.
Frequently Asked Questions
How much ventilation does a chicken coop need?
A general rule is to have at least 1 square foot of permanent, open ventilation area for every 10 square feet of coop floor space. However, more is almost always better, provided the airflow is managed correctly above the roost.
Should I close my coop vents in the winter?
Never seal the coop airtight. You must keep upper vents open year-round to allow moisture and ammonia to escape. You can block lower intake vents with temporary plastic sheeting to reduce wind speed, but the high exhaust must remain open.
What is the difference between a draft and ventilation?
Ventilation is the gentle, continuous exchange of stale air for fresh air, usually happening above the birds’ heads. A draft is a direct, concentrated stream of cold wind blowing across the roosting birds, which strips away their insulating body heat and causes illness.
Do I need a fan in my chicken coop?
Fans are not strictly necessary if you have excellent passive ventilation, but they are incredibly helpful in hot, humid climates during the summer. A solar-powered exhaust fan can significantly lower the internal temperature and reduce heat stress.
Creating a well-ventilated coop is one of the most impactful things you can do for your flock’s long-term health. By understanding how air moves and applying these practical chicken coop ventilation ideas, you ensure your birds stay dry, breathe easy, and remain productive regardless of the season.
Custom Coop With Cross-Breeze Windows

Source: Pinterest
This beautiful custom chicken coop features large sliding windows that can be fully opened during the warmer months. The design allows for maximum airflow across the interior, keeping the bedding dry and the flock comfortable.
Strategic window placement is one of the most effective ways to manage summer heat and reduce ammonia buildup. By positioning windows on opposite walls, you create a natural cross-breeze that continuously cycles fresh air through the roosting area.
If you are building a walk-in coop, consider installing sliding or hinged windows with hardware cloth backing. This ensures your birds get plenty of fresh air while remaining completely protected from predators and harsh weather.
DIY Winter Window Curtains

Source: Pinterest
When temperatures drop, rigid plastic sheeting or heavy canvas curtains become essential for managing coop windows. This simple setup allows you to block harsh winter winds from hitting the birds directly while still letting natural light filter into the space.
The key to winterizing is flexibility. By using temporary covers that can be easily rolled up or removed when the weather warms, you maintain the ability to flush out moisture and ammonia without sacrificing wind protection during freezing storms.
You can attach these temporary covers using bungee cords, snap fasteners, or simple wooden battens. This affordable hack is perfect for renters or those who want to adapt their existing coop without permanent structural changes.
The Power of the Insulated Coop

Source: Pinterest
Insulating your chicken coop walls helps moderate extreme temperature swings, keeping the interior cooler in summer and warmer in winter. However, insulation alone is not enough; it must be paired with excellent ventilation to prevent trapped moisture from ruining the materials.
When warm, humid air from the flock meets cold, insulated walls without an escape route, condensation forms rapidly. This is why insulated coops require dedicated ridge vents or high exhaust points to let the moisture escape before it condenses.
If you choose to insulate, ensure you use materials that are safe for poultry and cover them with a protective barrier like plywood or hard plastic. This prevents the birds from pecking at the insulation while maintaining a stable, dry interior environment.
Predator-Proof Top Netting

Source: Pinterest
For outdoor runs, covering the top with galvanized wire mesh or heavy-duty netting is essential for protecting your flock from hawks, owls, and climbing predators. This open-air approach provides the ultimate ventilation while keeping the birds completely secure.
Unlike a fully enclosed solid roof, wire mesh allows rain, snow, and natural breezes to pass through, which helps keep the run floor dry and reduces the buildup of odors. It also ensures the birds receive natural sunlight, which is vital for their health and egg production.
When installing top netting, ensure it is pulled taut and securely fastened to the frame with heavy-duty staples or screws. This prevents sagging under the weight of snow and stops determined predators from pushing their way through weak points.
Winter vs. Summer CFM Requirements

Source: Pinterest
Understanding the cubic feet per minute (CFM) of air exchange required for your coop helps you size your vents correctly. In winter, the goal is minimal but continuous exchange to remove moisture, whereas summer requires massive airflow to dissipate body heat.
This visual guide breaks down the mathematical requirements for different coop sizes and climates. By calculating your needs, you can avoid the common mistake of installing vents that are either too small to clear ammonia or too large to manage winter drafts.
Use this information when planning your build to determine the exact square footage of hardware cloth-covered openings you need. It takes the guesswork out of the process and ensures your flock has a scientifically sound environment year-round.
Visualizing Coop Air Flow

Source: Pinterest
Visual diagrams are incredibly helpful for understanding how air should move through a chicken coop. This illustration demonstrates the ideal pathway where cool, fresh air enters through protected lower vents and warm, stale air exits at the roofline.
Seeing the airflow mapped out makes it much easier to identify problem areas in your own setup. If your current vents are creating a wind tunnel directly across the roost, this diagram shows exactly how to redirect the flow using solid baffles or adjusted vent placement.
Keep this type of diagram handy when you are cutting new vent holes or adjusting existing ones. It serves as a perfect reference to ensure you are always prioritizing the birds’ comfort and respiratory health over simple hole-cutting.
The Passive Stack Effect Chimney

Source: Pinterest
This clever setup utilizes the ‘Stack Effect’ by placing intake vents at the floor level and a small chimney at the roof peak. This creates a passive thermal siphon that pulls cool air in and sucks heat and ammonia out continuously, 24/7.
The beauty of this system is that it requires no wires, no fans, and no noise. It relies entirely on the natural physics of warm air rising, making it an incredibly reliable and maintenance-free solution for off-grid or backyard homesteads.
To replicate this, you can build a simple wooden chimney box that extends above the roofline. Ensure the top is covered with hardware cloth and a rain cap to keep the elements out while allowing the warm air to escape freely.
Cold Weather Mistakes to Avoid

Source: Pinterest
Winter is the most critical time for coop ventilation, yet it is when most keepers make dangerous mistakes. Sealing the coop airtight to keep warmth in is the number one error, leading to massive moisture buildup and severe frostbite on combs and wattles.
This guide highlights the essential things you should never do when the temperature drops. It emphasizes that chickens tolerate dry cold remarkably well, but they cannot survive wet, stagnant air filled with ammonia fumes.
By learning from these common errors, you can protect your flock from preventable health issues. Focus on keeping the bedding deep and dry, maintaining high exhaust vents, and ensuring no direct wind sweeps across the roosting bars at night.
Step-by-Step Backyard Coop Plans

Source: Pinterest
For those ready to pick up a hammer, these step-by-step plans provide a complete roadmap for building a functional backyard coop. The design specifically incorporates proper ventilation zones, ensuring that airflow is built into the structure from the very first cut.
Following a proven plan saves you from the frustration of trying to retrofit vents later. These blueprints show exactly where to place windows, soffits, and access doors to maximize both human convenience and flock health.
Whether you are a beginner or an experienced woodworker, having a detailed guide helps you avoid structural weaknesses. The plans include material lists and cutting guides that make the project manageable over a weekend.
Hen Houses With Soffits and Windows

Source: Pinterest
This charming hen house design perfectly illustrates the combination of traditional windows and under-eave soffits. The soffits allow cool air to enter gently along the ceiling, while the windows can be opened fully for summer flushing.
Using soffits is one of the most elegant ways to add intake ventilation without creating unsightly holes in the side walls. The roof overhang naturally protects these intake areas from rain and snow, keeping the interior dry.
If you are building a new coop, consider adding continuous soffit vents along the entire length of the eaves. This provides a massive surface area for air intake, ensuring your coop never struggles for fresh air, even on the stillest days.
The Just Right Coop Roof Design

Source: Pinterest
The roof of your coop is prime real estate for ventilation. This design showcases how truss construction can be adapted to create a high, open ridge area that allows hot air to escape without letting in the elements.
A well-designed roof acts as a natural exhaust system. By leaving a gap at the peak and covering it with a protective ridge cap and hardware cloth, you create a permanent exit point for the warmest, most humid air in the structure.
When planning your roof, ensure the pitch is steep enough to shed snow and rain effectively. A steeper pitch also creates more volume in the upper loft area, giving the stale air more space to collect before it exits the vents.
Managing Ammonia Levels Naturally

Source: Pinterest
Ammonia is the silent enemy of the backyard flock. Produced by breaking down droppings, this pungent gas burns the birds’ respiratory tracts and makes them susceptible to serious infections. Proper ventilation is the only reliable way to keep it at safe levels.
This guide explains how airflow dilutes and removes ammonia before it can reach dangerous concentrations. It emphasizes that no amount of cleaning can replace the need for continuous air exchange in an enclosed space.
To support your ventilation efforts, consider using the deep litter method on the floor. The carbon-rich bedding helps absorb moisture and neutralize some ammonia at the source, working in tandem with your upper vents to keep the air clean.
Woods Open Air Coop Design

Source: Pinterest
The open air coop concept takes ventilation to the extreme by utilizing large sections of wire mesh instead of solid walls. This design, popularized by experienced keepers, provides the birds with an environment that feels almost like being outside.
While this approach is fantastic for hot climates and summer months, it requires careful management in colder regions. Keepers using this style often add temporary solid panels or heavy tarps to the windward side during harsh winter storms.
If you live in a mild climate, an open air design is arguably the healthiest option for your flock. It virtually eliminates ammonia issues and provides constant access to fresh breezes, sunlight, and natural humidity levels.
Raised, Quiet Nesting Areas

Source: Pinterest
Raising your coop off the ground is one of the simplest ways to improve ventilation and moisture control. The space underneath allows air to circulate around the entire floor, preventing ground dampness from seeping up into the bedding.
This design also creates a dedicated, quiet area for nesting boxes that is separated from the main roosting and dropping zones. The elevated position keeps the nests cleaner and drier, which is essential for consistent egg laying.
An elevated coop is also much easier to clean and inspect for predators. The airflow underneath helps dry out any accidental spills or droppings that fall through the floor slats, keeping the overall environment much more hygienic.
Secure Coop Window Setups

Source: Pinterest
Windows are essential for light and air, but they must be fortified against predators. This setup shows how to integrate heavy-duty hardware cloth directly into the window frame, ensuring the opening remains secure even when the glass or shutter is open.
The key is to mount the hardware cloth on the outside of the frame or sandwich it between two layers of trim. This prevents raccoons from reaching through the mesh to undo latches or pull the wire away from the wood.
Consider adding sliding wooden shutters on the outside of the window. These can be closed during extreme weather or at night for extra security, while the hardware cloth ensures that ventilation continues uninterrupted.
The Ultimate Poultry Shed Guide

Source: Pinterest
For those managing larger flocks or converting an existing shed into a poultry house, this ultimate guide covers the complexities of commercial-grade ventilation adapted for the backyard. It discusses intake and exhaust balancing on a larger scale.
Larger spaces require more strategic planning to avoid dead zones where air becomes stagnant. This guide explains how to position multiple intake and exhaust points to ensure every corner of the shed receives fresh air.
Whether you are using natural wind direction or installing active exhaust fans, the principles of pressure and airflow remain the same. This resource helps you scale up your ventilation strategy to match the size of your flock and your structure.
DIY Solar Fan Build

Source: Pinterest
When passive airflow isn’t enough to beat the summer heat, a solar-powered exhaust fan is a game-changer. This DIY build shows how to create an off-grid ventilation system that automatically kicks in when the sun is shining and the coop needs cooling.
Solar fans are incredibly efficient and eliminate the need to run dangerous extension cords into the coop. They are perfect for remote setups or for keepers who want to reduce their energy footprint while prioritizing flock comfort.
When building or buying a solar fan, ensure it has a sufficient CFM rating for your coop’s volume. Mount it high on the wall or in the gable to effectively pull the hottest air out of the upper reaches of the structure.
Rustic Wall-Mounted Air Vents

Source: Pinterest
Ventilation doesn’t have to be purely functional; it can also add to the charm of your backyard setup. These rustic, wall-mounted wooden vents feature integrated wire mesh, providing a classic farmhouse look while delivering necessary airflow.
Building custom vent covers allows you to match the architectural style of your home or other garden structures. You can use reclaimed wood or stained cedar to create pieces that look like intentional decor rather than afterthought holes.
Ensure that any decorative vent cover still maintains the required square footage of open mesh for adequate air exchange. The visual appeal should never compromise the primary goal of keeping the interior air fresh and healthy.
Farm Hacks for Large Barns

Source: Pinterest
Managing air quality in a large barn or multi-section coop requires different strategies than a small backyard box. This collection of farm hacks focuses on practical, low-cost ways to improve airflow in larger structures using existing architecture.
Techniques might include utilizing existing barn cupolas, adding large roll-up side walls for summer, or installing industrial-style shutters that can be adjusted based on the wind direction. These methods prioritize flexibility and volume.
For larger flocks, the sheer volume of moisture produced is significant. These hacks help you move massive amounts of air quickly, ensuring that even the birds in the center of the barn benefit from fresh, dry conditions.
Perch Height and Respiratory Health

Source: Pinterest
The height of your roosting bars is directly linked to your flock’s respiratory health. Ammonia is heavier than air and tends to pool near the floor, while fresh air circulates higher up. This diagram illustrates why perches should be positioned well above the ground.
By elevating the roosts, you ensure the birds spend their sleeping hours breathing the cleanest air available in the coop. This is especially important in smaller coops where the volume of air is limited and ammonia can build up quickly.
Aim for roosts that are at least 2 to 3 feet off the ground, and always higher than your lowest intake vents. This simple adjustment can dramatically reduce the incidence of chronic respiratory issues in your flock.
8 Essential Interior Features

Source: Pinterest
A well-designed coop interior balances all the needs of the flock: safety, comfort, and hygiene. This guide highlights the eight essential features, showing how ventilation integrates with nesting boxes, feeders, and dropping boards.
Seeing the entire layout helps you understand how each element affects the others. For example, placing a dropping board under the roost catches the majority of waste, which significantly reduces the ammonia load that your ventilation system must handle.
Use this checklist when evaluating your own coop. If you are missing one of these key features, you can often retrofit it with a weekend project that will greatly improve the daily life of your birds and your ease of maintenance.
Ventilation That Prevents Smell

Source: Pinterest
If you can smell your coop from the backyard, your ventilation is failing. This design focuses on the direct relationship between airflow, moisture control, and odor elimination. Proper ventilation keeps the bedding dry, which is the key to a smell-free environment.
Wet bedding breeds bacteria, which produces the foul odors and ammonia that harm your birds. By ensuring a constant flow of dry air across the floor and out the roof, you create an environment where bedding can actually stay dry for weeks.
This approach is perfect for beginners who want a low-maintenance, low-odor setup. It combines the right vent placement with the deep litter method to create a self-regulating system that is pleasant for both the keeper and the neighbors.
The Danger of Improper Fan Use

Source: Pinterest
While fans can be great for cooling, placing them incorrectly can create a hazardous dust storm inside the coop. This image serves as a stark warning about what happens when a fan blows directly across dry bedding and droppings.
Fans should always be used as exhausts, pulling air out of the coop, rather than as circulating fans that blow air around inside. Blowing air across the floor kicks up dander, dust, and dried fecal matter, which the birds then inhale.
If you use a fan, ensure it is mounted high and pointed outward or upward. This creates negative pressure that draws fresh air in through the intake vents without disturbing the litter on the floor, keeping the air clean and the birds safe.
New Chick-Inn Coop Design

Source: Pinterest
The ‘New Chick-Inn’ design represents a modern approach to backyard poultry housing, focusing on efficiency and health. This innovative layout incorporates specialized ventilation channels that work in harmony with the interior roosting arrangement.
Modern designs often prioritize the separation of the birds from their waste, using slanted floors or dropping boards that make cleaning easier and reduce the ammonia source. Ventilation is then tailored to this specific layout to maximize its effectiveness.
If you are looking for a coop that feels more like a piece of modern garden architecture, this design offers a fresh perspective. It proves that you don’t have to sacrifice style to provide a highly functional, well-ventilated home for your flock.
Venting and Cooling the Chicken House

Source: Pinterest
Summer heat can be just as dangerous as winter cold if not managed properly. This guide focuses on strategies for venting and cooling the chicken house, ensuring the birds don’t suffer from heat stress during the hottest months.
Techniques include maximizing shade around the coop, using reflective roofing materials, and creating a wind-tunnel effect with strategically placed windows. Active cooling, like misting systems or frozen water bottles, can also be used in extreme conditions.
Remember that chickens do not sweat; they pant to cool down. High humidity makes panting ineffective, so ventilation is crucial for removing moisture from the air. A dry, breezy coop is the best defense against summer heat.
Love these ideas? Follow @theclutteredblog on Pinterest for more cozy, practical gift inspiration!