










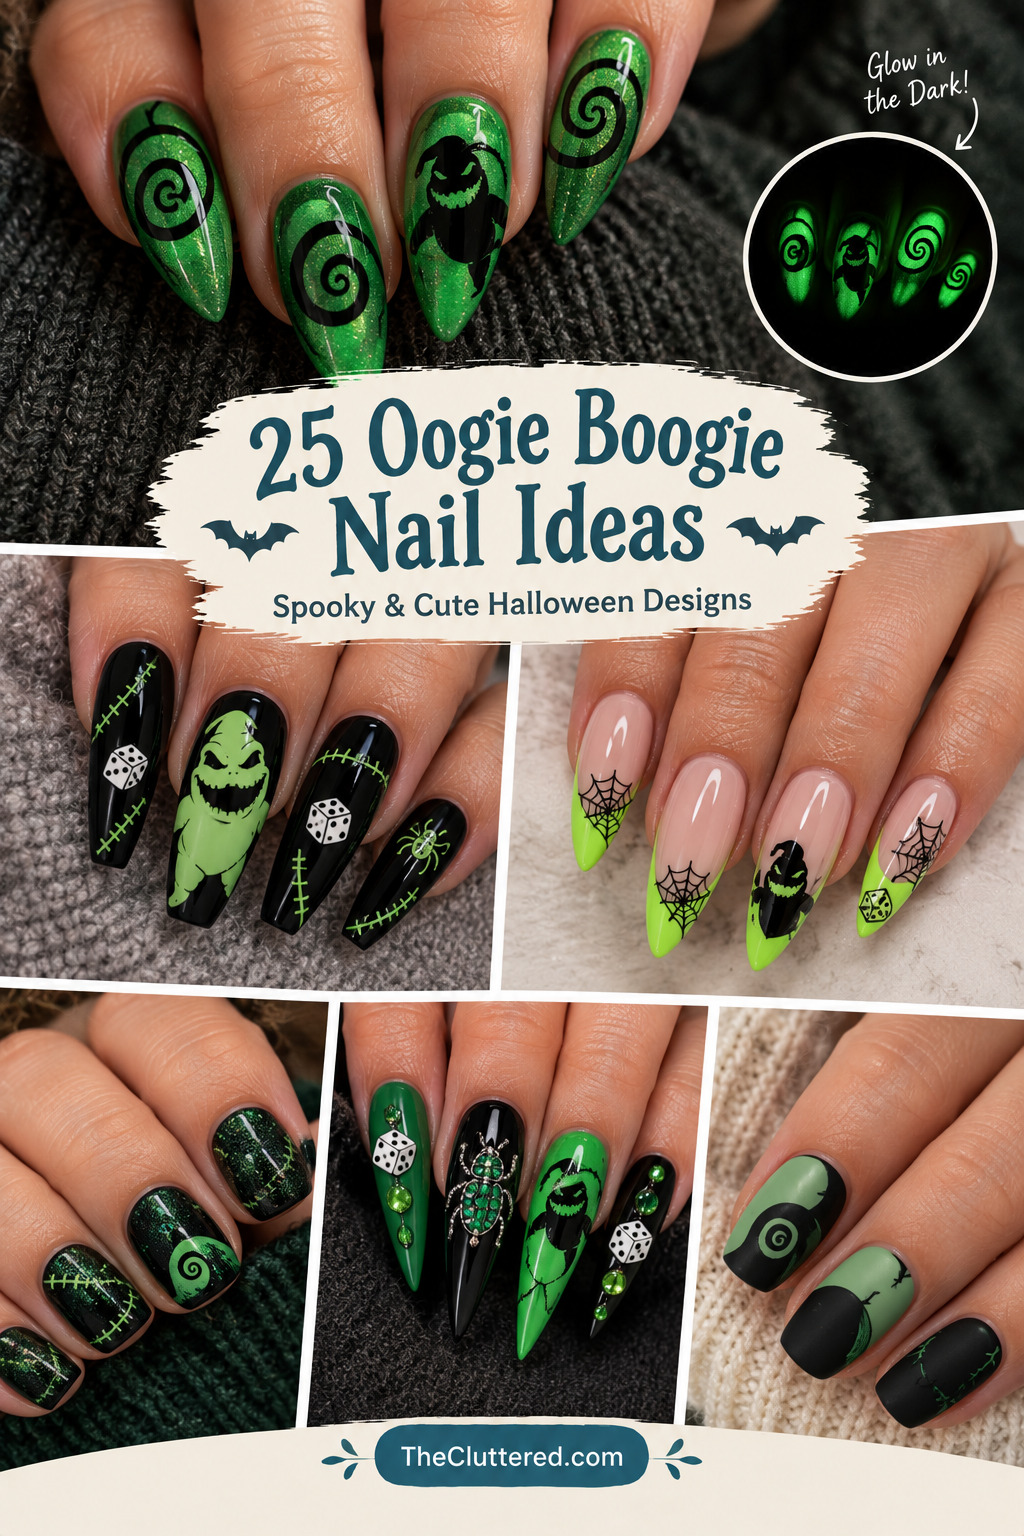


If you’re obsessed with The Nightmare Before Christmas and want to bring some Halloween Town magic to your fingertips, Oogie Boogie nails are the perfect spooky choice. This bug-filled villain from Tim Burton’s classic film offers endless creative possibilities—from his signature green color and burlap sack texture to dice, spiders, and those iconic spiral patterns.
Whether you’re looking for simple green and black designs or elaborate hand-painted character art, we’ve rounded up 25 stunning Oogie Boogie nail ideas that range from beginner-friendly to show-stopping. These designs work beautifully for Halloween parties, October celebrations, or anytime you want to channel your inner spooky Disney fan.
Quick Start: Find Your Perfect Oogie Boogie Nail Style
For Beginners: Start with simple green and black color blocking or press-on nails featuring Oogie Boogie designs.
For Halloween Parties: Go bold with glow-in-the-dark green spirals, 3D dice charms, or full character face art.
For Everyday Spooky Vibes: Try subtle spider web accents, green French tips, or minimalist spiral hill patterns.
Budget-Friendly: Press-on nails and DIY designs using nail stickers can achieve the look for under $20.
Salon-Worthy: Hand-painted acrylic or gel designs with 3D elements range from $50-$100+ depending on complexity.
Why Oogie Boogie Nails Are Perfect for Halloween
Oogie Boogie represents everything fun about Halloween—spooky without being terrifying, playful yet edgy, and instantly recognizable to Disney fans. His distinctive green color palette (ranging from neon lime to deep emerald) pairs beautifully with black, creating that classic Halloween contrast that never goes out of style.
The character’s design elements offer incredible variety for nail art:
- Green spirals and swirls reminiscent of his burlap sack texture
- Dice motifs representing his gambling addiction
- Spider and bug details from his lair
- Stitched accents mimicking his sewn-together appearance
- Glow-in-the-dark potential for extra spooky effect
Popular Oogie Boogie Nail Design Categories
1. Character Face Nails
These designs feature Oogie Boogie’s grinning face, complete with his bug eyes and stitched mouth. Perfect for making a bold statement, these work best on accent nails or as a full set for maximum impact.
2. Green & Black Color Schemes
The simplest approach uses Oogie Boogie’s signature colors in various patterns—ombre, color blocking, French tips, or marbled effects. These designs are versatile enough for both casual and formal Halloween events.
3. Spiral & Swirl Patterns
Inspired by the spiral hill from the movie and Oogie’s sack texture, these flowing patterns create movement and visual interest. They work beautifully with glow-in-the-dark polish for an extra magical touch.
4. 3D Embellished Nails
Add dimension with tiny dice charms, rhinestone bugs, or textured elements that bring the design to life. These require more skill but create stunning, conversation-starting nails.
5. Minimalist Designs
For those who prefer subtlety, simple green accents, small spider details, or tiny dice symbols on neutral nails capture the theme without overwhelming.
Choosing the Right Nail Shape & Length
Your nail shape can enhance the Oogie Boogie theme:
| Nail Shape | Best For | Difficulty Level |
|---|---|---|
| Almond | Elegant, elongating effect; great for character art | Medium |
| Coffin/Ballerina | Modern, edgy look; perfect for bold designs | Medium-Hard |
| Stiletto | Dramatic, spooky aesthetic; maximum impact | Hard |
| Square | Practical, everyday wear; good for beginners | Easy |
| Rounded/Squoval | Natural look; versatile for any design | Easy |
Application Methods: Which Is Right for You?
Press-On Nails
Pros: Affordable ($10-$25), instant application, no damage to natural nails, removable for work/school, wide variety of pre-designed options.
Cons: Less durable (last 3-7 days), limited customization, may not fit all nail sizes perfectly.
Best for: Beginners, one-time events, testing designs before salon appointment.
Gel Nails
Pros: Long-lasting (2-3 weeks), glossy finish, chip-resistant, glow-in-the-dark options available.
Cons: Requires UV/LED lamp, professional removal recommended, higher cost ($40-$80).
Best for: Those wanting durability with moderate maintenance.
Acrylic Nails
Pros: Extremely durable, perfect for 3D art and extensions, customizable length and shape.
Cons: Most expensive ($50-$100+), requires fills every 2-3 weeks, can damage natural nails if not applied/removed properly.
Best for: Elaborate designs, those wanting long nails, special occasions.
DIY Natural Nails
Pros: Most affordable, complete creative control, no damage, satisfying to create yourself.
Cons: Time-consuming, requires practice and tools, less durable than professional options.
Best for: Nail art enthusiasts, budget-conscious crafters, those who enjoy the creative process.
Essential Supplies for DIY Oogie Boogie Nails
If you’re creating these designs at home, you’ll need:
- Base colors: Emerald green, neon green, black, nude/beige base
- Detail colors: White (for eyes/stitches), red (for mouth), gray (for dice)
- Special effects: Glow-in-the-dark polish, glitter (green/black), chrome powder
- Tools: Fine detail brushes, dotting tools, striping tape, nail art pens
- Embellishments: Tiny dice charms, rhinestones, spider charms, nail studs
- Finishing: Quick-dry top coat, matte top coat (optional for burlap effect)
Color Palette Inspiration
Stay true to Oogie Boogie’s aesthetic with these color combinations:
- Classic: Emerald green + jet black + white accents
- Neon Spooky: Lime green + black + glow-in-the-dark
- Muted Gothic: Sage green + charcoal + cream
- Bold & Bright: Neon green + hot pink + black (for a twist)
- Metallic: Green chrome + black + silver accents
Seasonal Timing & Occasions
Oogie Boogie nails are most popular during:
- Early October: Start of spooky season, Halloween parties
- Mid-October: Peak Halloween preparation, costume events
- Late October: Halloween week, trick-or-treating, parties
- Year-round: Disney fans, Tim Burton enthusiasts, gothic aesthetic lovers
Common Mistakes to Avoid
- Skipping base coat: Green polish especially can stain natural nails
- Rushing detailed art: Character faces need patience and steady hands
- Using dull tools: Fine detail brushes must be clean and sharp
- Forgetting top coat: Essential for protecting intricate designs
- Overcrowding nails: Give each design element room to breathe
- Ignoring nail prep: Clean, filed, buffed nails ensure better adhesion
Maintenance & Longevity Tips
Keep your Oogie Boogie nails looking fresh:
- Apply cuticle oil daily to prevent drying and lifting
- Wear gloves for cleaning and dishwashing
- Avoid using nails as tools
- Reapply top coat every 3-4 days for DIY manicures
- Touch up chips immediately with matching polish
- For press-ons, avoid prolonged water exposure
Budget Breakdown
| Option | Cost Range | Longevity |
|---|---|---|
| Press-on nails | $10-$25 | 3-7 days |
| DIY with regular polish | $15-$40 (supplies) | 5-7 days |
| DIY with gel polish | $50-$100 (initial kit) | 2-3 weeks |
| Salon gel manicure | $40-$80 | 2-3 weeks |
| Salon acrylic with art | $60-$120+ | 3-4 weeks with fills |
Frequently Asked Questions
How long do Oogie Boogie nails take to create?
Simple designs (solid colors, basic patterns) take 30-45 minutes. Moderate complexity (French tips, simple character elements) requires 1-2 hours. Intricate hand-painted faces or 3D embellishments can take 2-3 hours or require a professional salon appointment.
Can I make these nails if I’m a beginner?
Absolutely! Start with press-on nails featuring Oogie Boogie designs, or try simple green and black color blocking. Use nail stickers or stamps for character details. As you gain confidence, progress to hand-painted elements and more complex designs.
Will green nail polish stain my nails?
Green polish, especially darker or neon shades, can stain natural nails. Always use a quality base coat, and consider applying two thin layers rather than one thick layer. If staining occurs, it typically fades within a few days after removal.
How do I make my Oogie Boogie nails glow in the dark?
Use glow-in-the-dark nail polish as your top coat or for specific design elements like spirals. Charge the polish under bright light or sunlight for 10-15 minutes before entering a dark room. The glow effect typically lasts 2-4 hours and can be recharged.
What’s the best way to remove elaborate Oogie Boogie nail art?
For regular polish: Use acetone-free remover for basic designs, acetone for glitter or stubborn polish. For gel/acrylic: Soak in acetone for 10-15 minutes, gently push off softened product. For 3D embellishments: Remove charms first, then soak. Never peel or force off nail art, as this damages natural nails.
Your Next Steps
Ready to bring some Halloween Town magic to your manicure? Whether you choose simple press-ons for a quick Halloween party look or invest in elaborate salon art for the ultimate spooky statement, Oogie Boogie nails offer endless creative possibilities. Browse the 25 designs below for inspiration, save your favorites, and get ready to show off your Nightmare Before Christmas pride!
Remember: The best design is one that matches your personal style, skill level, and occasion. Don’t be afraid to mix and match elements from different designs or add your own creative twist to these spooky ideas.
Glow in the Dark Oogie Boogie Press-On Set

Source: Etsy
Step into Halloween Town with this spooky-cute press-on set featuring eerie green swirls, stitched accents, creepy dice, and that mischievous Oogie Boogie grin. The glow-in-the-dark effect adds an extra layer of magic, making these nails perfect for nighttime Halloween parties or haunted house visits.
These hand-painted press-ons are reusable and come with everything needed for application. The almond shape elongates fingers while providing enough surface area for detailed character art. The combination of glossy and matte finishes creates visual depth that mimics Oogie’s burlap sack texture.
Perfect for those who want salon-quality Oogie Boogie nails without the salon price tag. Apply the night before your Halloween event to let the glow charge under lights. These work beautifully for costume parties, Disneybounding, or showing off your Nightmare Before Christmas pride year-round.
Structured Oogie Boogie Mani with Surprise Thumbs

Source: Instagram via Nails by Maddie
This structured manicure showcases Oogie Boogie’s iconic green spirals and bug motifs with professional precision. The builder gel creates a strong, sculpted foundation that’s perfect for intricate nail art. The surprise thumb design adds an element of discovery that makes this set extra special.
Structured manicures are ideal for those who want durability without full acrylic extensions. The gel overlay strengthens natural nails while providing a smooth canvas for detailed artwork. This design balances spooky character elements with wearable elegance.
Request this at your nail salon by showing reference images of Oogie Boogie’s color scheme and spiral patterns. The structured base will last 2-3 weeks with proper care. Consider adding glow-in-the-dark polish to the spirals for extra Halloween magic.
Neon Glazed Oogie Boogie Nails

Source: Instagram via Nail Art by Jen
Neon green chrome powder creates an almost supernatural glow on these Oogie Boogie-inspired nails. The glazed finish catches light beautifully, while subtle spider web details and bug accents keep the Nightmare Before Christmas theme front and center.
This trendy chrome technique involves buffing metallic powder over cured gel polish for a mirror-like finish. The result is eye-catching and modern while still honoring the classic character. The neon green shade is particularly striking against black accent nails.
Achieve this look by applying neon green gel polish, curing, then buffing chrome powder with an eyeshadow applicator. Seal with a no-wipe top coat for maximum shine. This design photographs beautifully for social media and makes a bold statement at any Halloween event.
Hand-Painted Oogie Boogie Character Nails

Source: Instagram via Nails by Madonna
These hand-painted Oogie Boogie nails showcase incredible artistry with detailed character faces, bug eyes, and that iconic stitched grin. Each nail tells part of the story, creating a cohesive set that’s true to the Nightmare Before Christmas aesthetic.
Hand-painted character nails require steady hands and fine detail brushes. The artist builds up layers of color to create depth and dimension, starting with base colors then adding facial features, shadows, and highlights. This level of detail typically requires professional application.
If attempting this design yourself, practice on paper first using nail art brushes. Start with simple shapes for the face, then add details gradually. Use reference images of Oogie Boogie for accuracy. Allow each layer to dry completely before adding the next to prevent smudging.
Oogie Boogie Nails by Nail Art by Jen

Source: Instagram via SXC Cosmetics
This popular tutorial demonstrates how to create stunning Oogie Boogie nails from start to finish. The design features vibrant green spirals, black accents, and character-inspired details that capture the essence of Halloween Town’s bug-filled villain.
Video tutorials are invaluable for learning nail art techniques. Watch how the artist builds the design layer by layer, from base coat to final top coat. Pay attention to brush techniques, color placement, and how to create clean lines and smooth gradients.
Follow along at home by gathering your supplies before starting. Work in good lighting and take your time with each step. Don’t worry if your first attempt isn’t perfect—nail art is a skill that improves with practice. Save this tutorial for reference during your next DIY session.
Classic Green and Black Oogie Boogie Nails

Source: Pinterest
Sometimes the simplest designs make the biggest impact. This classic green and black combination captures Oogie Boogie’s essence without overwhelming detail. The alternating colors create visual interest while remaining wearable for various occasions.
The beauty of this design lies in its versatility. It works for Halloween parties, Disney trips, or everyday wear for fans of the character. The green shade can range from neon lime to deep emerald depending on your preference and skin tone.
Create this look at home with two polishes and steady hands. Paint alternating nails in green and black, or try an ombre effect blending the two colors. Add simple spiral details with a dotting tool or thin brush for extra character recognition.
Oogie Boogie French Tip Nails

Source: Amazon
These playful Oogie Boogie French tips combine classic manicure elegance with spooky character details. Glossy black tips meet nude bases, while green character accents, spider webs, and stitched details add Nightmare Before Christmas flair.
French tip nails are experiencing a major comeback, and this Halloween-inspired version proves the style’s versatility. The nude base keeps the look wearable while the bold green designs and black tips create that perfect spooky contrast.
To recreate this design, start with a nude or pink base coat. Once dry, use striping tape or French tip guides to create clean black tips. Add green Oogie Boogie details like spirals, dice, or bug eyes using fine detail brushes. Finish with a high-shine top coat.
Halloween Nails Collection Featuring Oogie Boogie

Source: Etsy
Browse through Halloween nail collections to find the perfect Oogie Boogie design for your style and skill level. Etsy offers countless handmade press-on options from independent creators who specialize in character nail art.
Shopping for press-on nails allows you to see multiple design variations side by side. Look for sellers with good reviews, clear photos, and size options that fit your nails. Many creators offer customization if you have specific requests.
When ordering press-ons, measure your nail beds beforehand to ensure proper fit. Most sets come with multiple size options and adhesive tabs or glue. Read application instructions carefully for best results and longest wear.
Glitter Chrome Oogie Boogie Nails

Source: Pinterest
Glitter chrome powder takes Oogie Boogie nails to the next level with an almost liquid metal finish. The green chrome reflects light beautifully, creating depth and dimension that flat polish can’t achieve. This finish is particularly striking in photos and under party lights.
The chrome effect requires gel polish as a base and special buffing technique. After curing the green gel base, rub chrome powder with a silicone applicator in circular motions until you achieve that mirror-like shine. Seal immediately with a no-wipe top coat.
This design works especially well on almond or coffin-shaped nails where the elongated surface showcases the chrome effect. Pair with black accent nails or add Oogie Boogie character details in matte finish for contrast.
Glow-in-the-Dark Spiral Oogie Boogie Nails

Source: Pinterest
These glow-in-the-dark Oogie Boogie nails feature the character’s signature spiral patterns that actually illuminate in low light. The effect is both spooky and magical, perfect for Halloween parties, haunted houses, or trick-or-treating after dark.
Glow-in-the-dark nail polish contains phosphorescent pigments that absorb light energy and release it slowly in darkness. For best results, charge the polish under bright lights or sunlight for 10-15 minutes before entering dark spaces.
Apply glow polish as your base color or use it for specific design elements like spirals or accents. Layer over black polish for maximum contrast. The glow effect typically lasts 2-4 hours and can be recharged multiple times throughout the evening.
Coffin-Shaped Oogie Boogie Nails

Source: Pinterest
Coffin-shaped nails (also called ballerina nails) provide the perfect canvas for bold Oogie Boogie designs. The tapered shape with flat tip creates a modern, edgy look that’s particularly fitting for this spooky character theme.
This nail shape requires length and is typically achieved with acrylic or gel extensions. The elongated surface area allows for detailed character art, while the dramatic silhouette makes a strong style statement even before adding color or design.
Combine the coffin shape with Oogie Boogie’s signature green and black colors for maximum impact. Try alternating nails between solid green and black, or create ombre effects that flow from one color to the other. Add spiral details or character faces on accent nails.
Nightmare Before Christmas Character Nails

Source: Pinterest
Dedicate each nail to a different Nightmare Before Christmas character—Oogie Boogie, Jack Skellington, Sally, Zero, and more. This approach creates a wearable tribute to the entire film while giving Oogie Boogie his well-deserved spotlight.
Character collection nails require planning and sketching beforehand. Decide which character goes on which finger, considering nail size and design complexity. Oogie Boogie works well on larger nails like the middle or ring finger where there’s more space for detail.
Use reference images from the movie for accuracy. Start with base colors for each character, then build up details layer by layer. Allow adequate drying time between layers to prevent smudging. This design is best attempted with patience and good lighting.
Y2K-Inspired Oogie Boogie Nails

Source: Instagram via Silver14 Nail
These handmade press-on nails blend Y2K aesthetics with Oogie Boogie’s spooky charm. The design features modern color blocking, chrome accents, and contemporary nail art techniques while honoring the classic Nightmare Before Christmas character.
Y2K nail trends include bold colors, chrome finishes, butterfly motifs, and playful designs. Incorporating these elements with Oogie Boogie’s green and black palette creates a fresh, current take on the character that appeals to modern aesthetics.
Custom press-on sets like these offer the perfect solution for those who want unique, trendy designs without salon appointments. They’re reusable, affordable, and allow you to experiment with bold styles commitment-free.
25 Creepy-Cool Oogie Boogie Nail Ideas

Source: Sheen Aura
Explore comprehensive collections of Oogie Boogie nail ideas featuring everything from simple green spirals to elaborate 3D character art. These roundups provide visual inspiration and help you identify which style matches your skill level and aesthetic preferences.
When browsing nail art collections, save your favorite designs to a dedicated board or folder. Note common elements you love—whether it’s specific colors, shapes, techniques, or embellishments. This helps communicate your vision to nail technicians or guides your DIY attempts.
Pay attention to difficulty levels indicated in tutorials or descriptions. Start with simpler designs if you’re new to nail art, then gradually progress to more complex techniques as your skills develop. Practice makes perfect!
Neon Green Oval Oogie Boogie Nails

Source: Pinterest
Neon green brings electric energy to Oogie Boogie nails, creating a modern, eye-catching interpretation of the classic character. The oval shape provides a soft, feminine silhouette that balances the bold color beautifully.
Neon polishes can be tricky to apply evenly due to their often sheer formula. Apply thin coats, allowing each to dry completely before adding the next. Three to four thin layers typically achieve full opacity with neon shades.
Pair neon green Oogie Boogie nails with black accent nails or use black polish for detailed character elements like spirals, dice, or bug eyes. The high contrast creates visual impact and ensures the design reads clearly as Oogie Boogie-inspired.
Simple Green Oogie Boogie Manicure

Source: Instagram via Glowy
Sometimes less is more. This simple green Oogie Boogie manicure proves you don’t need elaborate character art to capture the essence of the spooky villain. A solid green shade with subtle accents creates an elegant, wearable look.
Simple designs are perfect for beginners or those short on time. Choose a green polish that matches Oogie Boogie’s signature color—anything from lime to emerald works. Add one or two accent nails with simple spiral patterns or dice symbols.
This approach works beautifully for everyday wear, work-appropriate Halloween celebrations, or when you want to show your NBC pride without overwhelming detail. The simplicity also means easier touch-ups and longer wear between manicures.
Annual Nightmare Before Christmas Nail Set

Source: Instagram via Alexia X Nails
For many Nightmare Before Christmas fans, getting themed nails is an annual Halloween tradition. This beloved ritual marks the start of spooky season and brings joy year after year. Oogie Boogie designs remain a popular choice for these seasonal manicures.
Creating an annual nail tradition gives you something to look forward to each October. You might recreate the same design for nostalgia, or try a new Oogie Boogie interpretation each year to keep things fresh while honoring the tradition.
Document your annual NBC nails with photos to create a visual timeline of your Halloween manicures through the years. Share them on social media with fellow fans or keep them private as personal seasonal memories.
Spooky Halloween Nail Art Ideas

Source: Allure
Editorial features from beauty publications like Allure showcase professional-level Halloween nail art, including Oogie Boogie designs. These high-quality images provide inspiration and demonstrate what’s possible with skilled application and quality products.
Professional nail art galleries often include technique tips, product recommendations, and difficulty ratings. Use these resources to understand what goes into creating salon-worthy designs and whether they’re achievable at your skill level.
Even if you can’t recreate complex editorial designs at home, you can bring reference photos to your nail technician. Professional artists can adapt editorial looks to fit your preferences, nail shape, and budget.
Glow-in-the-Dark Beetlejuice Cat Eye Nails

Source: Instagram via Daily Charme
While technically Beetlejuice-themed, these glow-in-the-dark cat eye nails share aesthetic DNA with Oogie Boogie designs—spooky characters, neon colors, and magical effects. The techniques demonstrated here work beautifully for Oogie Boogie nails too.
Cat eye polish contains magnetic particles that create dimensional patterns when manipulated with a magnet. Combined with glow-in-the-dark pigments, the effect is mesmerizing. This advanced technique requires practice but creates stunning results.
Apply cat eye gel polish, hold the magnet over the nail for 10-15 seconds to create the signature stripe pattern, then cure. Add glow-in-the-dark top coat or use glow polish as your base. The combination creates nails that look amazing in any lighting.
Easy Nightmare Before Christmas Nails

Source: Fashion So Simple
Easy Nightmare Before Christmas nail tutorials break down character designs into manageable steps perfect for beginners. These guides typically use simple techniques like dotting tools, striping tape, and basic brushwork to create recognizable Oogie Boogie elements.
Follow-along tutorials are invaluable for building nail art confidence. Work at your own pace, pause videos when needed, and don’t worry if your first attempt isn’t perfect. Each practice session improves your skills.
Gather all supplies before starting your DIY session. Having everything within reach prevents frustration and polish drying mid-design. Set aside 1-2 hours for your first attempt at character nail art to avoid rushing.
Oogie Boogie Builder Gel Infill

Source: Instagram via Alexandria
Builder gel infills maintain your Oogie Boogie nails while adding fresh character art. This technique fills in growth at the cuticle area and refreshes the design, extending the life of your manicure by 2-3 weeks.
Type 3 art refers to intricate, hand-painted designs that require advanced skill. Oogie Boogie’s detailed face, spirals, and bug elements qualify as type 3 art. This level of detail justifies professional application for best results.
Flash glitter adds sparkle and dimension to Oogie Boogie designs. Apply glitter gel strategically on accent nails or use it to highlight specific design elements like the character’s eyes or dice. Seal with top coat to prevent glitter snagging.
Oogie Boogie Nail Tutorial Step-by-Step

Source: Pinterest
Step-by-step tutorials showing the progression from bare nails to finished Oogie Boogie art are invaluable learning tools. These visual guides break down complex designs into manageable stages, making advanced nail art accessible to determined beginners.
Pay attention to each stage: nail prep, base coat application, color blocking, detail work, and finishing. Notice how the artist builds layers, allows drying time, and uses different tools for different effects. This systematic approach is key to professional results.
Save tutorial images to your phone for reference during your DIY session. Having visual guidance at each step prevents mistakes and keeps you on track. Don’t skip steps—even experienced nail artists follow systematic processes.
ATL Nails Oogie Boogie Design

Source: Instagram via Shaped by Shay
Professional nail technicians in Atlanta and beyond showcase their Oogie Boogie nail art on Instagram, providing inspiration and proof of what’s possible with skilled application. These portfolio pieces demonstrate advanced techniques and creative interpretations.
Follow nail artists whose style resonates with you. Many technicians accept appointments for custom character designs or can recreate designs from reference photos. Building a relationship with a skilled nail tech means you have a go-to person for seasonal themed manicures.
When booking character nail art, bring multiple reference photos and be specific about what elements you want. Discuss timeline (detailed art takes longer), cost (character art typically costs more), and maintenance requirements before your appointment.
Pretty Oogie Boogie Character Nails

Source: Pinterest
Oogie Boogie nails don’t have to be purely spooky—they can be pretty too! This design balances the character’s edgy aesthetic with feminine touches like softer color transitions, elegant nail shapes, and refined execution.
Combining “pretty” and “spooky” creates a unique aesthetic that’s perfect for those who love Halloween but prefer polished, elegant designs. Think glossy finishes, clean lines, and strategic placement of character elements rather than full coverage.
This approach works beautifully for October events that aren’t strictly Halloween-focused, like fall parties or Disney trips. The design shows your NBC pride while remaining sophisticated enough for various occasions.
Horror Character Nail Art Collection

Source: Pinterest
Horror character nail art collections often feature Oogie Boogie alongside other beloved spooky movie characters like Gremlins, Beetlejuice, and more. These designs celebrate Halloween movie culture through wearable art.
Mixing multiple horror characters on one set creates conversation-starting nails that show off your genre knowledge. Dedicate each nail to a different character, or blend elements from multiple movies into cohesive designs.
When combining characters, consider color palettes that work together. Oogie Boogie’s green pairs surprisingly well with Gremlins’ earth tones and Beetlejuice’s black and white stripes. Unified color schemes make multi-character designs feel cohesive rather than chaotic.
Love these ideas? Follow @theclutteredblog on Pinterest for more cozy, practical gift inspiration!