


Outdoor kitchens are amazing—until smoke hangs under your pergola, grease coats everything, and your eyes burn every time you cook. Diy Outdoor Grill Vent Hood projects can fix that, but they sit right at the intersection of heat, grease, electricity, and building codes, so you want a plan that’s more than “just hang a fan over the grill.” Most outdoor experts agree that sizing, placement, and using components rated for outdoor BBQ duty matter more than any pretty cover you build.


This guide breaks down diy outdoor kitchen grill hood basics, an outdoor bbq hood sizing guide, frame‑and‑cover designs with inserts, low‑budget “shack” ideas, and key outdoor grill vent hood installation tips you cannot skip. You’ll also get a simple checklist so you can organize your build your own bbq vent hood project without losing track of safety details.

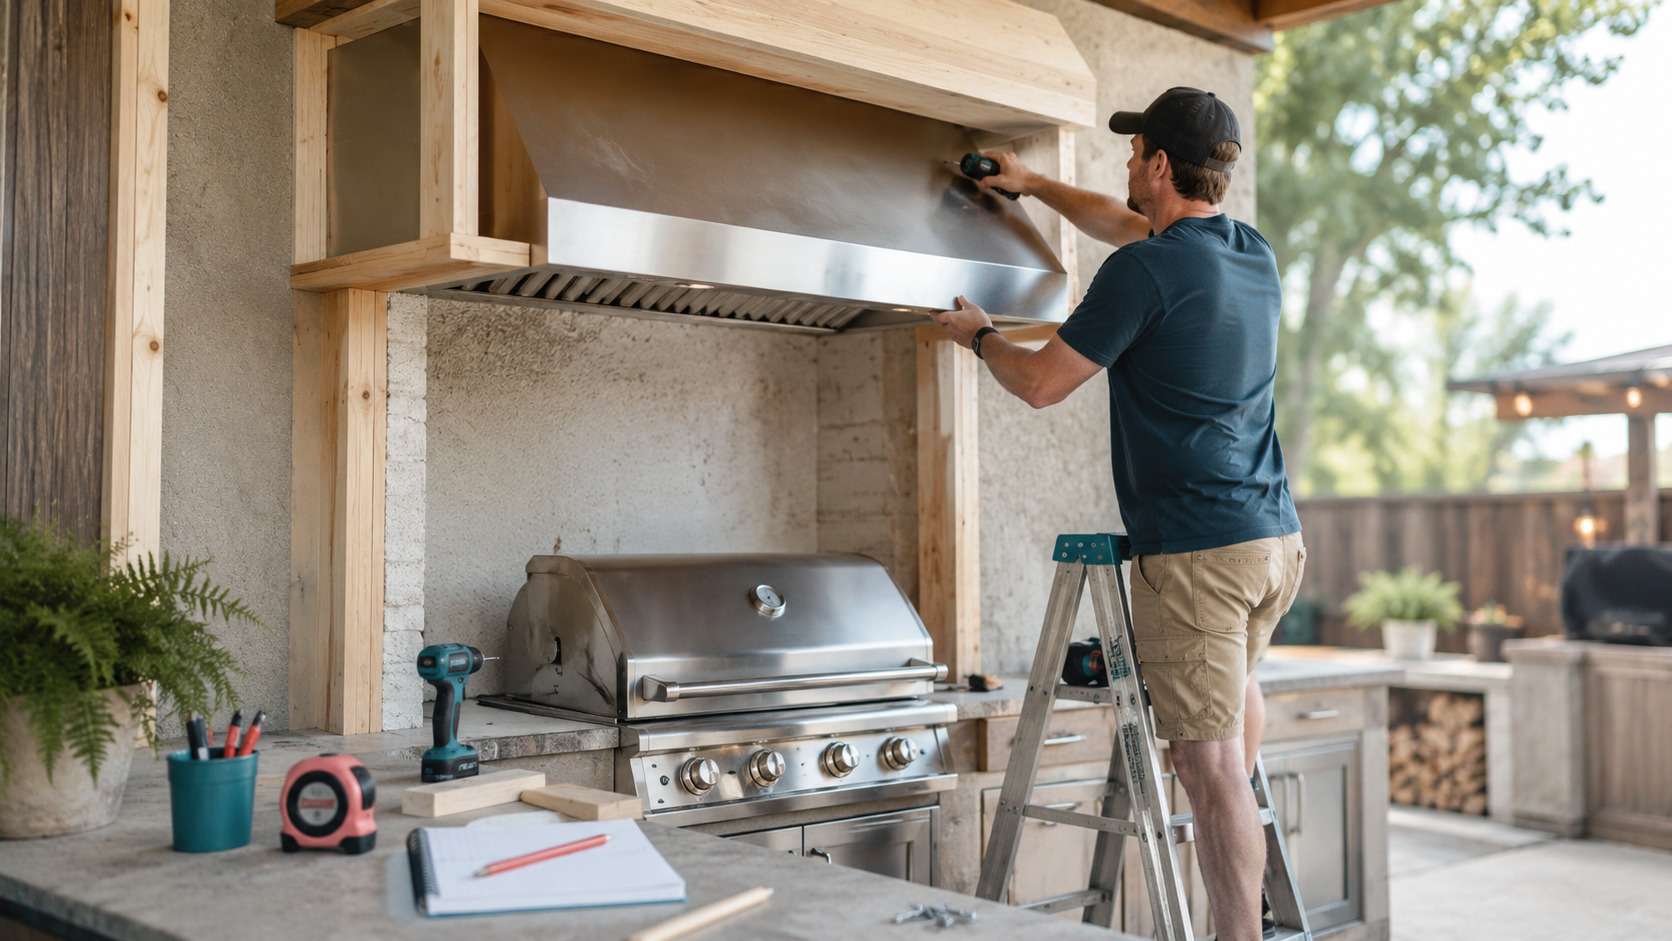
Key Sizing And Placement Rules For Outdoor BBQ Hoods
Before you sketch any diy range hood cover for outdoor kitchen plans, you need your numbers: grill width, hood width, height above the cooking surface, and duct path. Outdoor hood guides are consistent on one point: your diy outdoor grill vent hood should be wider than the grill to catch smoke that drifts in the wind.
Core sizing basics from an outdoor bbq hood sizing guide:
- Width: Many manufacturers recommend that the hood extend at least 6 inches (about 15 cm) past the grill on each side, so roughly 12 inches (about 30 cm) wider overall, and some installers suggest going up to 12 inches per side in windy or partially open setups.
- Height above cooking surface: Outdoor venting specialists commonly recommend mounting the hood 32–36 inches above the cooking surface to balance heat safety and smoke capture—often higher than indoor ranges due to the grill’s intensity.
- Canopy depth and coverage: A depth around 30–36 inches is often suggested so the canopy actually projects out over the front of the grill and catches smoke from both back and front burners.
When in doubt, size up your diy outdoor kitchen grill hood slightly larger than your grill and keep it centered over the cooking surface, not over the grill lid, to give smoke a clear “target” to rise into.
Frame + Insert: The Most Practical Diy Outdoor Kitchen Grill Hood
For many homeowners, the most realistic build your own bbq vent hood approach is to buy an outdoor‑rated insert and then build a custom shell around it. This lets you combine pro‑grade performance with a diy wood range hood cover for outdoor kitchen or stucco finish that matches your space.
Typical steps:
- 1. Choose an outdoor‑rated insert
- Look for inserts specifically labeled for outdoor use and high heat, with stainless baffle filters and higher CFM for open‑air conditions.
- Confirm compatible duct size (often 10 inches or more for large grills) and follow the manufacturer’s outdoor grill vent hood installation tips.
- 2. Build a structural frame
- Many diy outdoor kitchen grill hood projects use pressure‑treated or exterior‑rated 2×4 framing anchored into wall studs, masonry, or a sturdy pergola beam.
- Frame a box that’s sized to your insert plus the extra width and depth you want to show in your finished outdoor grill hood ideas.
- 3. Sheath and finish the cover
- For a stucco grill hood diy, sheathing might be exterior‑grade plywood or cement board, then lath and stucco to match the house.
- For a diy wood range hood cover for outdoor kitchen, use exterior‑rated plywood and trim, keeping any combustible materials outside the clearances specified by your insert manufacturer.
- 4. Install the insert and ductwork
- Mount the insert into the framed opening per the manual, connect rigid metal duct (no flex) to run outside, and support the duct so it doesn’t sag.
- Keep the duct run as short and straight as possible—few elbows, rigid metal only, and always vented fully outdoors.
This route gives you a diy outdoor grill vent hood that looks custom but relies on tested, outdoor‑rated components where it counts.
Low‑Budget Smoke Hood Ideas For A BBQ Shack
If you’re working on a very basic BBQ shack or detached structure and want to improve smoke control without a full built‑in, there are more experimental outdoor grill hood ideas floating around in forums and DIY communities. These ideas can be useful, but they require careful attention to safe diy bbq vent hood practices.
Common low‑budget concepts:
- Barrel or drum “hood”
- Some builders cut a 50‑gallon drum or stock tank lengthwise to create a curved canopy above a grill, then connect it to a metal flue and a powerful exhaust fan.
- The key here is to use metal components, high‑temperature sealants, and a fan that is rated to handle grease and heat, not a standard kitchen or bath fan.
- Custom sheet‑metal hood
- Another option is to fabricate a hood from aluminum or steel sheet, with folded and welded corners, then attach it to a masonry or concrete wall.
- Edges should be sealed with high‑temp, exterior‑grade silicone, and the design should still follow an outdoor bbq hood sizing guide: wider than the grill, with enough depth to cover the front edge.
Because many of these setups fall outside standard kits, it’s especially important to check local codes, focus on fire safety, and consider having at least the fan and electrical portions checked by a pro.

Non‑Negotiable Safety Rules For Any Diy Outdoor Grill Vent Hood
No matter how creative your diy outdoor kitchen grill hood design is, certain safety principles are not optional. Brand manuals and installer guides repeat the same core advice: use outdoor‑rated gear, respect clearances, and design ductwork like a real exhaust system, not a decorative box.
Key outdoor grill vent hood installation tips:
- Use a hood insert specifically rated for outdoor grills—open‑air conditions, higher BTUs, more grease, and more moisture require different materials and motor sizing than indoor range hoods.
- Follow manufacturer instructions for mounting height, side clearance, and distance from combustible materials; outdoor guidance frequently recommends 32–36 inches above the cooking surface for safe smoke capture.
- Design the duct as a short, straight, rigid metal run venting fully outside, with as few elbows as possible and proper termination caps; avoid flex duct and recirculating designs.
- Terminate exhaust a safe distance from windows, doors, and covered seating so you’re not blowing smoke and grease back where people are sitting.
- Ensure electrical work is done to code, including outdoor‑rated wiring, switches, and GFCI protection where required; many manuals advise having a qualified technician handle final hookups.
If any part of your build your own bbq vent hood plan conflicts with the insert’s installation manual or local codes, the safe diy bbq vent hood move is to pause and get professional input.
Quick Planning Checklist For Diy Outdoor Grill Vent Hood
Use this checklist to keep your project organized from idea to installation:
- Measure your grill width and depth, then decide how wide should outdoor grill vent hood be (aim for at least 6 inches wider per side, more if your area is very windy).
- Confirm mounting height targets (around 32–36 inches above the cooking surface, or as specified by your insert) and check your structure can support that position.
- Choose a rated insert for diy outdoor grill vent hood or diy outdoor kitchen grill hood use, with appropriate CFM, stainless baffle filters, and compatible duct size.
- Decide on your cover style: stucco grill hood diy, diy wood range hood cover for outdoor kitchen, or a more industrial metal approach.
- Map the duct path with as few bends as possible, rigid metal only, venting fully outside and away from windows, doors, and seating.
- List any tasks that should be handled or at least checked by a pro (electrical, structural fastening, final inspection).
Treat this checklist as your baseline; you can add style details later, but these structural and safety decisions need to be locked in first.
A well‑planned diy outdoor grill vent hood can make your outdoor cooking area feel cleaner, safer, and more enjoyable. Start by getting the sizing and safety right, then layer on the frame, cover, and finishes that match the rest of your outdoor kitchen.

FAQ
FAQs About Diy Outdoor Grill Vent Hood
I don’t have much time—what’s the simplest approach to get better ventilation?
If your time is limited, skip complex fabrication and focus on an outdoor‑rated insert paired with a basic box frame and straightforward duct run. Many diy outdoor kitchen grill hood guides suggest using a pre‑made insert plus simple framing as the fastest path to a functional diy outdoor grill vent hood. Keep your design minimal—no extra curves or weird angles—and prioritize getting the width, height, and duct layout correct.
My energy is low—what’s the minimum I should do to keep things safe?
When your energy is low, you can still build your own bbq vent hood safely by focusing on three non‑negotiables. First, choose a fan or insert rated for outdoor grill use, not a kitchen or bathroom fan. Second, follow outdoor grill vent hood installation tips about clearances and rigid metal ducting that vents fully outside. Third, have a qualified person double‑check electrical connections and structural support even if you handle the framing yourself.
How do I stay consistent if I’m slowly upgrading my whole outdoor kitchen?
Create a simple standard for all your outdoor projects: same materials palette, similar framing methods, and a shared sizing logic for appliances and hoods. If you treat your diy outdoor grill vent hood as part of a “system”—with consistent outdoor bbq hood sizing guide rules and ductwork principles—it will be easier to add side burners, a pizza oven, or a second hood later without redoing everything. Save your measurements, sketches, and product manuals in a shared folder so future upgrades plug into the same plan.
My outdoor space is small—are these ideas still realistic?
Yes, but the smaller the space, the more important good ventilation becomes. In tight courtyards or under low pergolas, outdoor venting guides often recommend slightly oversizing the hood and being extra careful about duct routing and terminations. A compact diy range hood cover for outdoor kitchen with a properly sized insert can actually make small spaces much more comfortable by pulling smoke away from seating and nearby doors.
I feel mentally overloaded—where should I start planning?
Start with just two decisions: your grill size and where the hood can physically go above it. From there, answer one sizing question (how wide should outdoor grill vent hood be for this setup?) and one safety question (where can I send the duct straight out with minimal bends?). Once those are clear, everything else—frame style, stucco grill hood diy vs wood cover, and finish details—can be tackled later in small, manageable steps.
You don’t have to build a magazine‑worthy outdoor kitchen overnight. Start tiny by understanding your sizing, choosing a safe insert, and sketching one simple duct path, save this post for reference, and follow @theclutteredblog on Pinterest whenever you’re ready for more organized, step‑by‑step project ideas.


