












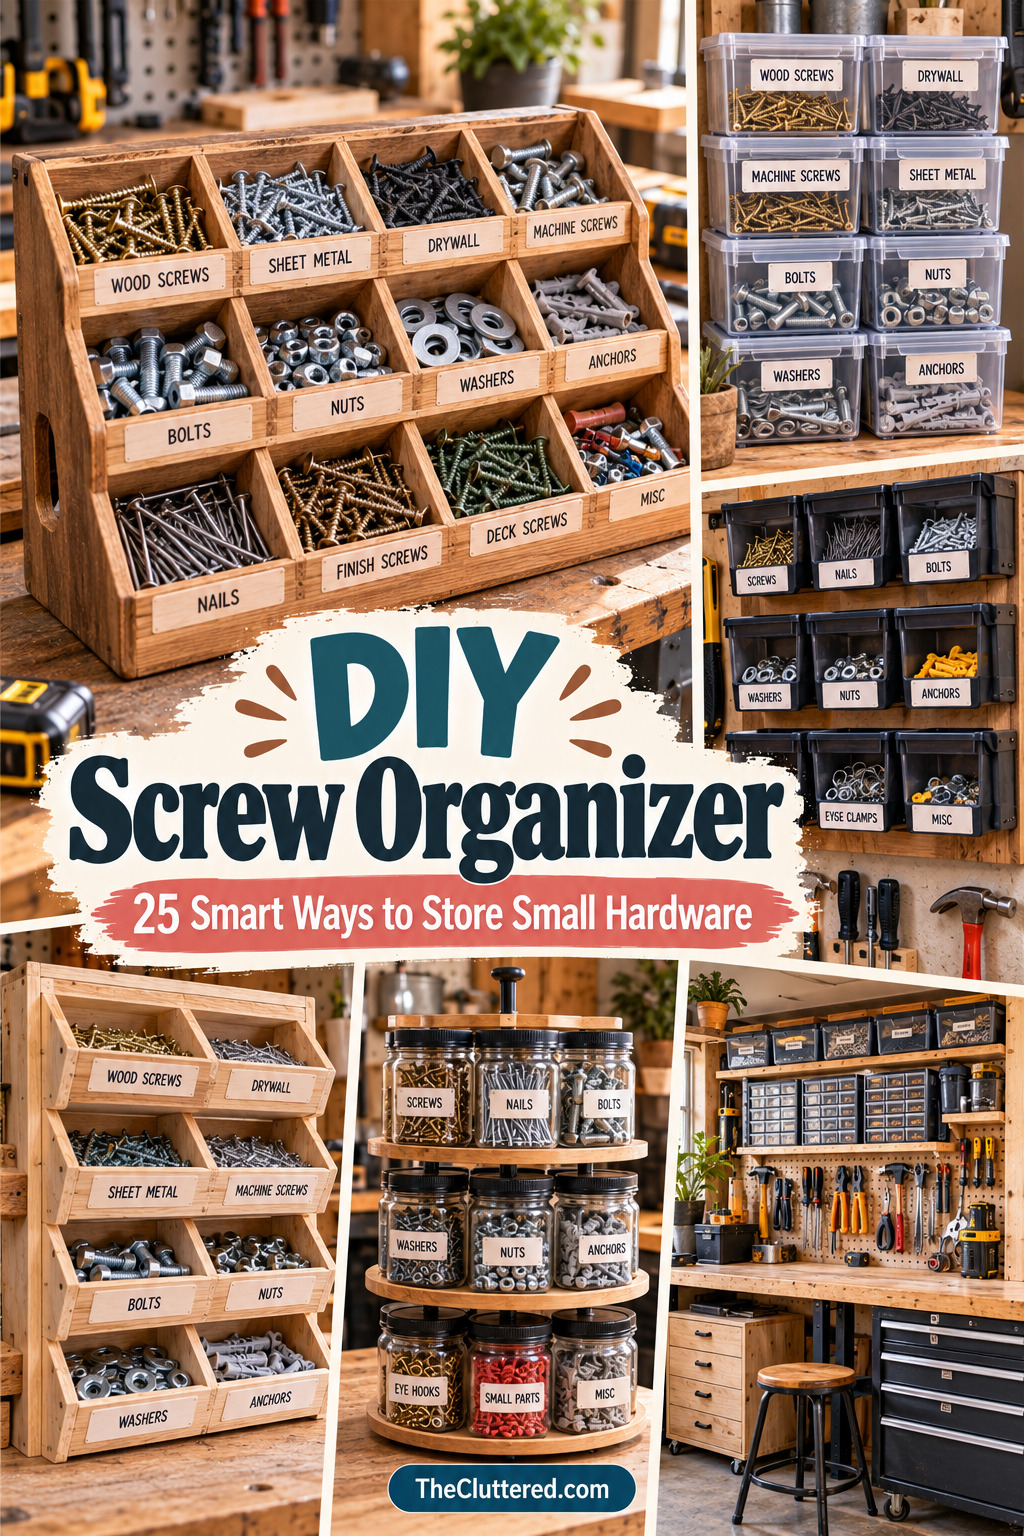


A good DIY screw organizer does more than make a workshop look tidy—it makes the next project easier to start. When screws, nails, bolts, washers, and other tiny hardware have a predictable home, you spend less time sorting and more time building. The best system is not necessarily the biggest one; it is the one that matches the hardware you actually use and the space you actually have.
Below are practical ways to organize small hardware using boxes, bins, drawers, wall storage, repurposed containers, and workshop systems. Some ideas are simple enough for a quick weekend project, while others are better treated as inspiration for a larger storage setup.
Start With the Storage Problem You Actually Have
Start with divided boxes or small labeled bins.
Move frequently used hardware onto a wall.
Use vertical or rotating storage to save footprint.
Separate screws, nails, bolts, washers, and specialty pieces.
The goal is simple: every category should have a home that is easy to reach and easy to return to. If a storage system is difficult to maintain, it will eventually become another mixed-up container.
25 DIY Screw Organizer Directions to Consider
There is no single correct way to store hardware. A clear box may be perfect for a small collection, while a busy workshop may need wall bins, drawers, or a modular cabinet. The ideas below show different ways to think about visibility, capacity, access, and available space.
1. Choose Containers Around Your Hardware
Start by grouping what you already own. Common screws can share a category, while specialty fasteners may deserve their own sections. Avoid creating a label for every tiny variation if doing so makes the organizer harder to maintain.
2. Make Visibility Part of the Design
Clear bins, open-front containers, shallow drawers, and labeled fronts all reduce the need to open multiple containers. If two screw sizes look similar, a clear view plus a useful label can be more valuable than a larger storage compartment.
3. Use Vertical Space When the Bench Is Full
Wall-mounted racks, pegboards, French cleats, and hanging containers can move hardware off the work surface. Keep frequently used categories at comfortable reach height and use higher storage for items you access less often.
4. Build Around Small Spaces
A compact workshop does not require a full wall of cabinets. A narrow rack, small drawer unit, rotating tower, or a few stackable bins can create meaningful storage without taking over the room.
5. Think in Systems, Not Just Containers
The strongest DIY hardware storage usually has a simple rule behind it. You might organize by hardware type, size, project, or frequency of use. Pick one logic and apply it consistently so putting items away is almost automatic.
How to Make a DIY Screw Organizer Work Long-Term
- Inventory first. Gather loose screws, nails, bolts, washers, anchors, and other small hardware before choosing the organizer.
- Group similar pieces. Separate categories that you routinely confuse or search for.
- Measure the space. Check the shelf, wall, drawer, cabinet, or workbench area where the organizer will live.
- Choose the access style. Use open bins for speed, closed containers for protection, or drawers when you want a cleaner visual surface.
- Label every category. Use short labels that make sense while you are actually working.
- Keep a little spare capacity. An organizer that is filled completely on day one leaves no room for the next project.
DIY Screw Organizer Checklist
- Sort screws, nails, bolts, washers, and specialty hardware into broad categories.
- Remove duplicates or hardware you no longer use before assigning storage space.
- Choose containers that fit the actual quantity of each category.
- Keep similar-looking screw sizes physically separated.
- Use clear fronts when visual identification matters.
- Use short, consistent labels on bins or drawers.
- Place everyday hardware within easy reach.
- Move rarely used hardware to higher or less accessible storage.
- Use vertical wall space when the workbench is crowded.
- Reserve a small section for new hardware that has not been sorted yet.
- Leave some empty capacity for future purchases or projects.
- Keep the organizer close to the tools that use the hardware.
- Test the system for a few projects before building more storage.
- Reassign empty categories instead of keeping unused compartments.
- Return hardware to the same location after each project.
FAQ
What is the easiest DIY screw organizer?
A divided box or a set of small labeled containers is usually the simplest starting point because it requires little construction and can be adjusted as your hardware collection changes.
How should I organize screws and nails?
Start by separating screws from nails, then divide further by size, type, or frequency of use. Use the rule that makes the hardware easiest to identify during a real project.
What works for a small garage or workshop?
Vertical storage, narrow wall racks, compact bins, and shallow drawers can use available space without consuming much workbench area.
Are jars or cans good for hardware storage?
They can be useful for larger or less frequently accessed categories, especially when the container can be labeled clearly and stored securely.
Should every screw size have its own compartment?
Not necessarily. Create separate compartments when the difference matters to your projects; otherwise, too many categories can make the organizer harder to maintain.
Make the Next Project Easier to Start
The best DIY screw organizer is the one that removes a small point of friction from your normal workflow. Start with the hardware that causes the most searching, give it a visible home, and expand the system only when you know what the workshop actually needs.
Whether you choose a simple screw box, wall-mounted bins, drawers, jars, or a larger workshop system, a little structure can turn a frustrating pile of small parts into a storage setup you can keep using.
DIY Screw Organizer Visual Inspiration
Use these sourced visuals as inspiration rather than as instructions to copy exactly. Each example highlights a different storage direction, from compact screw boxes and labeled bins to wall systems and broader workshop organization.
DIY Screw Box for Quick Sorting

A compact screw box keeps small fasteners together instead of letting them disappear into a mixed drawer. The reference visual focuses on a simple container-style approach that makes the storage idea easy to understand at a glance.
This style works especially well when you want a dedicated home for screws without building a large cabinet. The contained format also makes it easier to move a small hardware collection from a shelf to a workbench.
Adapt the idea by separating common screw types into individual sections, adding simple labels, and choosing a box size that matches the amount of hardware you actually keep.
DIY Screw Storage Ideas for a Neater Workshop

Grouped screw storage makes it easier to see the difference between several fastener types before you start a project. This reference collection is useful for thinking about how many categories your own organizer needs.
The key is to give each category a defined place rather than treating every small fastener as one large pile. A few clear divisions can make a workshop feel much more manageable.
Start with the hardware you use most often, then create additional sections only when they solve a real sorting problem. That keeps a DIY organizer useful instead of oversized.
How to Make a Screw Organizer Box

A purpose-built organizer box can turn loose screws into a contained, repeatable storage system. The visual emphasizes compartments and a workshop-friendly form rather than decorative storage.
This approach is useful when you want a sturdier DIY solution than a loose jar or plastic bag. A box can stay on a shelf, workbench, or inside a cabinet while keeping hardware grouped.
Choose compartment sizes around your actual fasteners and label the sections clearly. You can also reserve a small area for the hardware you reach for most frequently.
Build a Wooden Screw Organizer

Separating screws and nails prevents two commonly mixed hardware categories from becoming one frustrating drawer. The reference visual centers on organized, easy-to-identify small parts.
This system is practical for a workshop where several fastener types are used throughout the week. Clear grouping reduces the amount of sorting you need to do before starting a repair or build.
Use separate bins or sections for screws, nails, anchors, bolts, or specialty pieces as needed. If a category stays nearly empty, reclaim that space for something you use more often.
Organize Screws and Nails by Type

A wall-mounted screw rack uses vertical space instead of consuming the full surface of a workbench. The visual is a useful reference for keeping small hardware visible and within reach.
Wall storage can be especially helpful when drawer space is limited. Open or clearly labeled compartments make it easier to scan what is available before opening multiple containers.
Place the most frequently used sizes at comfortable reach height and keep less-used hardware higher or lower. A simple label strip can make the system much easier to maintain.
Wall-Mounted Screw Rack Inspiration

Wooden bins give screws and bolts a defined home while adding a sturdy workshop feel. The reference visual suggests a straightforward compartment approach for hardware that needs quick access.
This type of organizer can be scaled to the size of your collection and fitted to a shelf, wall, or workbench area. It also creates a consistent visual language across a DIY workshop.
Keep categories broad enough to maintain, but specific enough that you do not have to rummage through a bin. Add labels based on size, type, or the project where the hardware is commonly used.
Wooden Bins for Screws and Bolts

A tidy toolbox benefits from treating small hardware as deliberately as larger tools. The reference image shows how organization can make a toolbox feel more usable without adding complicated infrastructure.
This is helpful when screws and small pieces travel with you between projects. A consistent compartment system means you can return items to the same place after a job.
Use small removable containers, dividers, or labeled sections inside the toolbox. Keep the categories intuitive so another person can find the right fastener without asking where it belongs.
Keep Small Hardware Easy to Find

A rotating hardware tower is designed around vertical capacity, making it an interesting solution when floor or shelf space is limited. The reference visual highlights access from a compact footprint.
Rotation can make several categories reachable from one station while reducing the need for a long row of separate bins. It is especially relevant to workshops that store many small parts.
Think of this as a space-planning concept rather than a requirement to copy the exact construction. A smaller rotating unit can be adapted to the amount of hardware you actually need to store.
Rotating Hardware Storage for Tight Spaces

Small-parts storage becomes easier when every category has a visible destination. The reference visual focuses on multiple bins arranged as a dedicated station for tiny workshop components.
This kind of setup works well for mixed hardware such as screws, bolts, washers, connectors, and other pieces that are easy to lose. It also makes restocking and cleanup more systematic.
Use transparent or open-front containers when visibility matters most, and group similar parts together. Labels can carry the information that the containers cannot show from a distance.
Organize Small Parts Without the Clutter

In-wall hardware storage turns unused wall depth into a dedicated storage zone. The reference visual is a strong example of keeping small parts organized without taking over the workbench.
This approach can be valuable in a compact garage or workshop where every surface has a job. Keeping hardware against the wall also leaves more room for active projects.
Plan the categories before building the storage so the openings, bins, or shelves match the hardware you own. Keep the most-used sections easiest to reach.
In-Wall Hardware Storage for a Clean Workshop

A plywood bin wall offers a high-capacity way to create many small storage compartments from a simple material. The reference is useful for visualizing a full wall of organized parts.
This style can make a large collection easier to scan because each container has a defined location. It is also flexible enough to group hardware by type, size, or frequency of use.
Scale the number of bins to your space rather than filling the entire wall automatically. Add labels and leave a little room for future categories so the organizer can grow with your projects.
One-Sheet Plywood Bin Organizer

Clear bins are a practical choice when you want to see screws before opening a container. The reference visual supports a compact storage approach using visible categories and stackable organization.
Visibility can save time when several fasteners look similar. Clear containers also make it easier to notice when a frequently used size is running low.
Use small clear bins for high-frequency categories and larger containers for bulk hardware. A cabinet or drawer can keep the collection protected while preserving the quick visual check.
Clear Bins for Compact Screw Storage

A fastener storage guide can be organized around screws, nails, bolts, and related workshop hardware. The reference visual reinforces the idea of treating these small parts as a system rather than loose supplies.
This is useful when a workshop has grown beyond one box or drawer and needs clearer categories. A simple system can reduce repeated sorting and make cleanup easier.
Choose one organizing rule and keep it consistent: by type, by size, by use, or by project. Mixing several rules in the same drawer can make retrieval harder.
A Simple Fastener Storage System

Repurposed coffee cans show how ordinary containers can become useful hardware storage. The reference idea is especially relevant to low-cost DIY organization.
Reusing containers can be a practical way to test a storage system before investing time in a custom build. It also gives you a way to create larger categories for bulk hardware.
Clean, sturdy cans can hold larger screws, bolts, or workshop pieces, while smaller containers handle tiny parts. Add labels so the reuse looks intentional and remains easy to maintain.
Repurpose Coffee Cans for Hardware Storage

DIY hardware organizer plans can provide a starting point for building storage that matches your workshop instead of buying a fixed configuration. The reference points toward plan-based organizer ideas.
Plans are useful when you want to control dimensions, materials, and the number of compartments. They also make it easier to build around an existing wall, shelf, or workbench.
Before choosing a design, count your hardware categories and measure the space you can dedicate to storage. Then simplify the plan wherever a feature does not solve a real problem.
DIY Hardware Organizer Plans to Explore

Small-parts bins are useful when a woodshop has many tiny items that need to stay separated. The reference visual emphasizes compact containers rather than one oversized storage box.
This format works well for screws, dowels, bits, connectors, and other workshop pieces that benefit from individual categories. Small bins can also be rearranged as your needs change.
Keep the bins shallow enough to see the contents and label the front edge. Reserve a few empty positions for new hardware so the system does not become cramped immediately.
Small Parts Bins for a Woodshop

A wooden wall organizer can turn a blank workshop surface into a dedicated screw and hardware zone. The reference visual suggests using vertical storage to keep small parts accessible.
Vertical organization is particularly useful when the workbench is already crowded. It moves storage upward while keeping frequently used hardware visible.
Combine labeled compartments with a clear category order, such as screws first, then bolts, washers, and specialty pieces. Keep the sequence consistent across the wall.
Wooden Wall Storage for Screws and Hardware

A screw storage wall can create a single visual home for hardware that would otherwise spread across drawers and shelves. The reference emphasizes dedicated wall organization for small parts.
This can be a strong direction for a small workshop because the storage uses vertical space and keeps categories visible. It also creates a clear boundary between active work surfaces and supplies.
Use a modular layout so you can add or move containers when your hardware collection changes. Label each section from the beginning instead of waiting until the wall becomes crowded.
Wall-Mounted Small Parts Organizer

A wall-mounted small-parts organizer provides visibility without requiring a large floor footprint. The reference visual shows the familiar workshop approach of many compact bins grouped together.
This style is useful when you have many different small hardware categories and want them available near the work area. It can also make restocking easier because empty sections are immediately noticeable.
Group parts by a rule that makes sense during real projects, such as screw type first and size second. Avoid creating so many categories that returning items becomes a chore.
French Cleat Wall Storage for Workshop Tools

A French cleat storage wall offers a flexible workshop framework for tools and accessories. The reference visual is broader than screws alone, but it demonstrates how a wall system can create room for dedicated hardware storage.
The value is the adaptable structure: storage can be moved, rearranged, or expanded as the workshop changes. Small hardware containers can become one part of the larger wall system.
Reserve a section of the wall for screw and fastener bins, keeping those containers close to the projects where they are used. Label the zone so the hardware has a consistent home.
Pegboard Storage for Tools and Small Hardware

Pegboard organization demonstrates another way to make vertical workshop space work harder. The reference visual focuses on visible tools, but the same layout thinking can support small hardware nearby.
Keeping tools and hardware within one visual zone can make a compact workspace easier to navigate. The key is assigning each category a predictable location.
Use the pegboard for tools and attach or place small-part containers where they remain easy to reach. Keep tiny fasteners in closed or stable containers if the area gets bumped frequently.
Rolling Workshop Storage for Flexible Organization

A rolling workshop storage system shows how storage can move with the project instead of staying fixed to one wall. The reference visual focuses on a mobile workshop setup.
Mobility is useful when your workspace serves several projects or when you need to clear a bench quickly. Small hardware drawers or bins can become part of the rolling system.
Organize the mobile unit by frequency of use, keeping everyday screws and fasteners closest to the working height. Use labels so the system remains understandable wherever it is parked.
DIY Workshop Storage Projects

A workshop storage system can combine several smaller organizers into one coherent setup. The reference visual is useful for seeing how different storage projects can work together.
Rather than building one giant organizer, you can create a few focused zones: screws, tools, bits, and larger supplies. This makes each storage decision easier to maintain.
Start with the category that causes the most frustration, build that organizer first, and expand only after you know what works. A modular approach keeps DIY storage from becoming another project pile.
Tool Organization with Compartments

Compartmentalized tool organization shows how defined slots can make frequently used tools easier to locate. The reference is centered on pliers, but the underlying idea also applies to small hardware.
Separating tools and hardware prevents the two categories from competing for the same drawer space. It also makes the workshop easier to reset after a project.
Use compartments for tools with distinct shapes and keep screws or fasteners in smaller labeled containers nearby. The result is a storage system where each item has an obvious destination.
DIY Tool Storage Ideas for a More Organized Workspace

DIY tool storage can combine several practical ideas into a more organized workspace. The reference collection is broader than screws, but it offers useful inspiration for building a coordinated workshop.
Hardware storage works best when it supports the way you actually move through a project. Keep small fasteners near the tools or workbench areas where they are most frequently needed.
Choose one small improvement first—such as a labeled screw box or wall bin—and build outward from there. A useful organizer does not need to transform the entire workshop at once.
Love these ideas? Follow @theclutteredblog on Pinterest for more cozy, practical gift inspiration!