












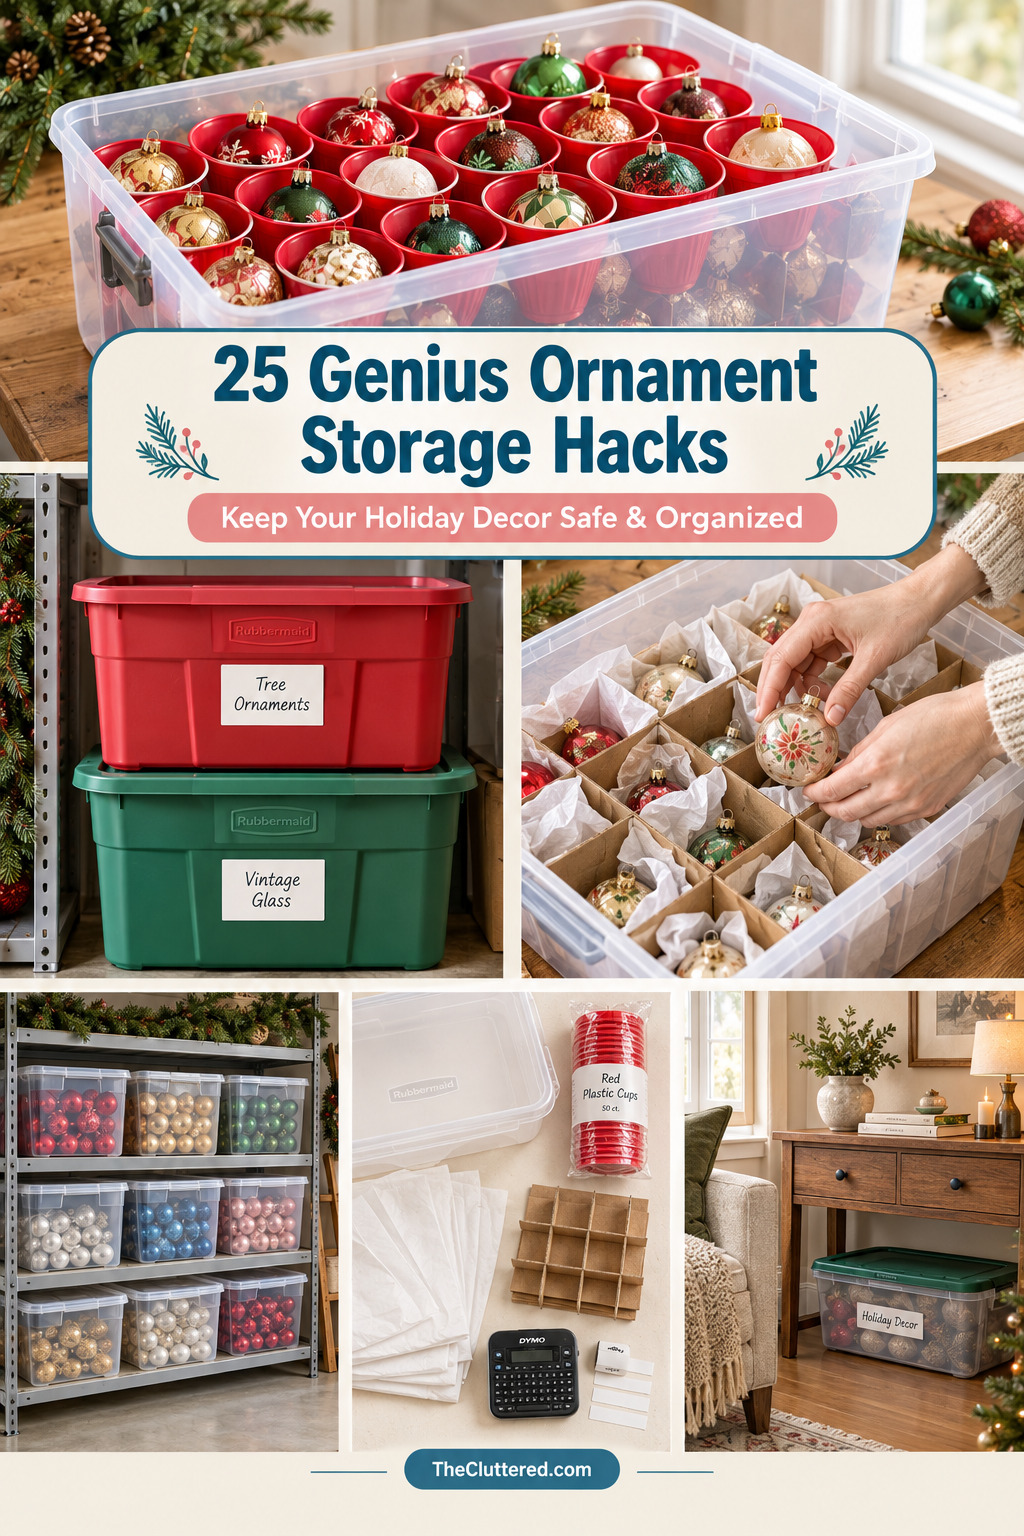


Packing up the tree and carefully wrapping fragile baubles can feel like a post-holiday chore, but setting up a reliable Rubbermaid Christmas ornament storage system changes everything. Sturdy plastic totes are the gold standard for holiday organization because they protect your delicate decor from moisture, dust, and pests in the attic or garage. Whether you prefer clear bins to see your color-coordinated collections at a glance or classic opaque totes to keep things discreet, mastering your bin setup ensures next year’s decorating is a breeze.
In this guide, we are exploring the most practical, budget-friendly, and visually satisfying ways to organize your holiday treasures. From clever DIY dividers using everyday household items to pro-level labeling strategies, you will discover exactly how to maximize your plastic storage bins for every type of ornament you own.
Quick Start: Find Your Perfect Storage Fit
Not all ornament collections are created equal. Before you start filling those plastic totes, figure out which organization strategy fits your specific holiday decor:
- For the Vintage Collector: Focus on shallow bins with acid-free tissue paper and custom cardboard grid dividers to prevent heavy pieces from crushing delicate antique glass.
- For the Family with Kids: Use the “plastic cup hack” inside deep Rubbermaid bins. It is virtually shatter-proof and makes it easy for little hands to help pack up the tree.
- For the Color-Coded Decorator: Invest in clear, stackable plastic containers. Group your ornaments by color or room, and label the short and long sides of the bins for easy garage shelving retrieval.
- For the Small-Space Dweller: Opt for under-bed storage bins or slim, flat totes that can slide into closet corners, utilizing soft-sided dividers to keep things compact.
Choosing the Right Rubbermaid Bins for Ornaments
The foundation of a great holiday storage system is the container itself. While any plastic tote will technically hold your decor, choosing the right shape and size makes a massive difference in how well your ornaments survive the off-season.
Shallow vs. Deep Totes
It is incredibly tempting to buy the massive, deep storage trunks to fit everything in one place. Resist the urge! Deep bins lead to a phenomenon where heavy items at the bottom crush the delicate ornaments layered beneath them. Shallow totes (around 6 to 10 inches deep) are vastly superior for ornament storage. They force you to stack ornaments in a single, safe layer and make it much easier to carry the bin without it becoming overwhelmingly heavy.
Clear vs. Opaque Plastic
Clear bins are a favorite among professional organizers because they offer instant visual inventory. You can easily spot the “Living Room Gold” bin without having to pull it down and pop the lid. However, if your bins will be stored in a highly visible area or on open shelving, opaque green or red holiday-specific totes offer a much cleaner, uniform look while protecting light-sensitive vintage pieces from fading.
DIY Dividers: The Secret to Shatter-Proof Storage
You do not need to spend a fortune on specialty ornament storage boxes with fabric trays. Some of the most effective organizers are DIY hacks using items you likely already have in your kitchen or recycling bin.
The Plastic Cup Method
This is arguably the most popular DIY Christmas ornament storage hack on Pinterest, and for good reason. Simply glue or tape red or green plastic party cups to the bottom of your Rubbermaid bin. Drop one ornament into each cup. The cups act as individual protective silos, preventing glass from clinking together, and they are inexpensive to replace if they ever crack.
Egg Cartons for Miniatures
Do not throw away your cardboard egg cartons! They are the absolute perfect size for storing tiny miniature ornaments, fragile tree toppers, or delicate floral picks. Stack the cartons inside your tote, and you have instant, biodegradable compartmentalization that costs absolutely nothing.
Cardboard Grids and Wine Boxes
For medium-to-large ornaments, cut strips of thick cardboard and slot them together to create a custom grid inside your plastic bin. Alternatively, save the thick cardboard boxes that wine bottles come in; the built-in dividers are incredibly sturdy and perfectly sized for standard round baubles.
Pro Tip: If you are wrapping ornaments in tissue paper before placing them in your DIY dividers, always ensure the paper is acid-free. Standard wrapping tissue can transfer dye onto light-colored or matte-finish ornaments over time.
Practical Application: Wrapping and Labeling
How you pack the bin is just as important as the bin itself. When storing Christmas ornaments in plastic containers, the goal is to eliminate empty space where items can roll and collide, while also providing a buffer against temperature fluctuations.
The Wrapping Hierarchy
- Shatterproof & Acrylic: Can be stored loose in dividers or grouped in zip-top bags by color.
- Standard Glass: Wrap individually in tissue paper, packing paper, or even cheap coffee filters before placing in cups or grids.
- Vintage & Heirloom: Wrap in acid-free tissue, then place in a soft cloth bag or bubble wrap. Never let bubble wrap touch the ornament directly, as it can trap moisture and leave permanent imprint marks on delicate paint.
Strategic Labeling
A labeled Christmas ornament storage bin is only useful if you can actually read the label when it is stacked. Always label your bins on both the long side and the short side. When bins are stacked deep on garage shelves, you usually can only see the short edge. Use a label maker or waterproof paint pens to note not just “Ornaments,” but specifics like “Tree – Flocking & Neutrals” or “Mantel & Wreath Accents.”
Your Post-Holiday Packing Checklist
Keep this quick reference handy when the tree comes down to ensure nothing gets damaged in the rush to clean up:
- Sort ornaments into categories (everyday, vintage, kids’ crafts, outdoor).
- Inspect for broken hooks or tangled strings before packing.
- Wrap all fragile glass in acid-free tissue or unprinted packing paper.
- Prepare your bin dividers (glue in cups or assemble cardboard grids).
- Place heaviest ornaments in the center of the bin, lightest on the edges.
- Fill any empty gaps in the tote with crumpled paper or packing peanuts to prevent shifting.
- Secure the lid tightly; consider using a small piece of packing tape if the bin will be moved frequently.
- Label the short and long sides of the bin with its specific contents.
- Store bins in a climate-controlled area if possible, away from direct attic heat.
- Keep a small “repair kit” (spare hooks, wire, glue) inside the main ornament bin.
- Store tree skirts and stockings in separate, breathable canvas bags to prevent mildew.
- Take a quick photo of the bin’s contents and tape it to the outside for instant visual reference.
- Stack heavier bins on the bottom, lighter bins on top.
- Celebrate knowing next December will be completely stress-free!
FAQ: Rubbermaid & Plastic Bin Storage
Can I use regular storage bins, or do they have to be holiday-specific?
You can absolutely use standard clear or opaque Rubbermaid totes. The holiday-specific red and green bins are fun and easy to spot, but a standard 16-quart or 27-quart clear plastic shoebox-style bin works beautifully and is often easier to find year-round.
How do I store large or awkwardly shaped ornaments in a bin?
Large ornaments, tree toppers, and floral picks often do not fit in standard dividers. Dedicate one shallow bin exclusively to “awkward shapes.” Lay them flat, separated by rolls of bubble wrap or thick towels, to ensure they do not bend or snap during storage.
Will plastic bins protect my ornaments from extreme attic temperatures?
Plastic bins protect against dust, pests, and physical crushing, but they do not insulate against extreme heat or cold. If your attic reaches very high temperatures in the summer, avoid storing candles, wax figures, or certain heat-sensitive glues in those bins. For glass ornaments, the plastic bin combined with paper wrapping is generally sufficient protection.
Taking the time to build a thoughtful Rubbermaid Christmas ornament storage system turns a dreaded January chore into a satisfying conclusion to the holiday season. By choosing the right shallow bins, utilizing clever DIY dividers, and labeling strategically, you ensure that your favorite holiday memories stay safe, beautiful, and ready to shine for years to come.
Classic Red & Green Bin Sorting

Source: Pinterest
This vibrant setup showcases a collection of festive red and green plastic storage totes neatly arranged on sturdy garage shelving. The bold colors immediately signal that these bins are dedicated strictly to holiday decor, making them easy to spot among everyday household storage.
Using color-coded bins is a fantastic psychological trick for staying organized. When you know that all the red bins contain tree ornaments and the green bins hold wrapping supplies, you eliminate the need to read tiny labels from a step stool, saving time and frustration during the busy decorating season.
To adapt this look, you can purchase holiday-specific totes during post-Christmas clearance sales. If you already have standard clear or blue bins, simply use large, colored duct tape or vinyl decals on the lids to create your own color-coded system without buying new containers.
Heavy-Duty Tree & Decor Totes

Source: The Simple Craft
This image highlights the necessity of oversized, heavy-duty plastic storage solutions designed specifically for bulky items like artificial Christmas trees and large wreaths. The thick plastic construction ensures that sharp pine needles and wire frames won’t puncture the sides of the bin.
Investing in a dedicated tree bin prevents the original cardboard box from disintegrating in a damp garage or basement. It also keeps pests like mice and silverfish away from the expensive wiring and flocking on your artificial tree, ensuring it looks fresh and beautiful year after year.
If you cannot find a bin long enough for your tree, consider breaking the tree down into its individual sections and storing each section in a separate, labeled large tote. This makes carrying the tree much easier and prevents the branches from getting permanently bent or crushed.
Vintage Canvas & Divider Totes

Source: Etsy
Here we see a set of vintage-style canvas ornament totes featuring sturdy internal dividers and clear vinyl windows on the front. The canvas material is breathable, which is excellent for preventing moisture buildup, while the internal stiffeners keep the tote structured even when empty.
Canvas totes are a wonderful alternative to hard plastic Rubbermaid bins, especially if you store your decorations in a closet or under the bed where softer edges are preferable. The built-in fabric dividers perfectly cradle standard-sized baubles, keeping them separated and secure without the need for DIY hacks.
You can easily recreate this breathable storage method by lining standard plastic bins with canvas drop cloths or using heavy-duty fabric storage boxes. Just ensure you add a layer of cardboard at the bottom to provide a rigid base for your dividers.
The Classic Red Bin Tree Solution

Source: Pinterest
This practical setup shows an artificial Christmas tree neatly packed away inside a large, festive red plastic storage bin. The bin is spacious enough to accommodate the tree sections while leaving a little room for the tree stand and a spare string of lights.
Using a solid red bin for the tree is a brilliant way to anchor your holiday storage system. Because the tree is the centerpiece of the holiday, giving it its own dedicated, easily identifiable bin ensures that you always know exactly where to start when it is time to decorate the living room.
To maximize space inside the tree bin, tuck smaller, soft items like tree skirts, stockings, or rolled-up ribbons into the empty gaps between the tree branches. This utilizes dead space and keeps all your primary tree accessories in one single location.
Clear Bin Garage Shelving System

Source: Pinterest
A beautifully organized garage shelf features a stack of uniform clear plastic bins, allowing the contents to be visible at a glance. The uniformity of the bins creates a clean, satisfying visual line that makes the storage space feel intentional and well-managed.
Clear bins are the ultimate time-saver for holiday storage. When you are looking for a specific set of outdoor lights or a particular wreath, you can simply scan the shelf without having to pull down heavy lids and dig through layers of tissue paper to verify what is inside.
To achieve this streamlined look, commit to buying the exact same brand and size of clear tote for all your holiday decor. Mixing and matching different shapes and lid styles creates visual clutter and makes stacking unstable, whereas uniform bins lock together securely and look fantastic.
DIY Cardboard Grid Dividers

Source: Lela Burris
This clever DIY project demonstrates how to create custom cardboard grid dividers that fit perfectly inside a standard plastic storage tote. The interlocking cardboard strips form individual cubbies that keep glass ornaments completely separated from one another.
Making your own dividers is incredibly budget-friendly and allows you to customize the size of each cubby to fit your specific ornament collection. Whether you have oversized statement baubles or tiny miniature figures, you can adjust the grid spacing to accommodate them perfectly without wasting space.
Save thick cardboard from shipping boxes or purchase inexpensive cardboard sheets from a craft store. Cut them into strips, snit halfway through the center of each strip so they slot together, and line the bottom of your Rubbermaid bin for instant, custom-fit protection.
The Famous Plastic Cup Hack

Source: Budget Savvy Diva
This iconic Pinterest hack features rows of red plastic party cups glued to the bottom of a storage bin, creating a vibrant, honeycomb-like structure for holding individual ornaments. Each bauble sits safely in its own cup, completely protected from its neighbors.
The plastic cup method is beloved because it is cheap, accessible, and incredibly fast to set up. You can buy a sleeve of cups for a few dollars, and the rigid plastic provides excellent crush protection. Plus, the festive red color adds a fun, holiday touch every time you open the bin.
Use a hot glue gun to secure the cups to the bottom of the tote and to each other so they don’t shift when you carry the bin. If you have larger ornaments that won’t fit inside the cups, simply omit a few cups in that area to create a larger open space for the oversized pieces.
Red & White Ornament Sorting

Source: Pinterest
This satisfying image shows a plastic container filled with ornaments meticulously sorted by color, featuring a section of vibrant reds and a section of crisp whites. The visual appeal of color-coordinating your storage makes the packing process feel more like curating a collection than doing a chore.
Sorting by color is not just about aesthetics; it is highly practical for decorators who like to change their tree themes or who have multiple trees in different rooms. When you need to add a pop of red to the dining room tree, you know exactly which bin to grab without having to dig through the gold and silver pieces.
To maintain this system, use zip-top bags or inexpensive mesh laundry bags for smaller items like ribbon, garland, or tree picks that match your color scheme, and tuck them into the corners of the corresponding color bin.
Clear Bins for Instant Inventory

Source: Organized Marie
These clear storage bins are packed neatly with holiday decorations, showcasing the beauty of being able to see exactly what is inside without opening the lid. The transparency eliminates the guesswork and makes taking inventory of your holiday collection incredibly simple.
Clear bins are especially useful for families who accumulate a lot of decor over the years. When you are trying to remember if you have enough gold ribbon for the mantel, a quick glance at the clear “Mantel Decor” bin gives you the answer instantly, saving you from buying duplicates.
If you prefer the look of opaque bins but want the benefit of visibility, try taking a polaroid or printing a digital photo of the bin’s contents and taping it to the outside of the lid or the short side of the tote for a custom visual label.
Viral Cup Divider Hack

Source: Pinterest
This close-up shot highlights the effectiveness of the plastic cup divider hack, showing delicate glass ornaments resting securely inside individual cups within a larger tote. The snug fit prevents the ornaments from rolling around or clinking together during transport.
This method went viral because it solves a universal problem: the heartbreak of opening a storage bin to find shattered heirloom ornaments. The cups act as shock absorbers, and if an ornament does happen to break, the cup contains the shards, keeping the rest of your collection safe from glass dust.
For an extra layer of protection, drop a small piece of tissue paper or a cotton ball into the bottom of each plastic cup before placing the ornament inside. This provides a soft cushion and prevents the glass from scratching against the hard plastic.
Stackable Seasonal Organization

Source: Pinterest
This image emphasizes the importance of stackable plastic bins for maximizing vertical space in a garage or attic. The interlocking lids allow the bins to sit securely on top of one another without slipping or crushing the contents of the lower bins.
When floor space is limited, building up is your best option. Stackable Rubbermaid totes are designed with reinforced rims specifically for this purpose, ensuring that your heavy bins of books or tools won’t compromise the integrity of your delicate holiday decor stored beneath them.
Always place your heaviest bins (like those filled with ceramics, heavy wooden decor, or the artificial tree) on the bottom of the stack. Reserve the top spots for lighter bins containing items like stockings, tree skirts, and string lights to maintain a safe, stable center of gravity.
15 Brilliant Storage Hacks

Source: A Cultivated Nest
This visual collage showcases a variety of clever storage hacks, including the use of egg cartons for miniatures, custom cardboard grids, and specialized wrapping techniques. It serves as a masterclass in thinking outside the box to protect your holiday investments.
Exploring multiple hacks allows you to tailor your storage system to the specific types of decor you own. While large glass baubles need cardboard grids, tiny vintage village pieces or fragile floral picks are perfectly preserved in the individual cups of a cardboard egg carton.
Keep a “hack kit” in your craft room consisting of hot glue, cardboard, acid-free tissue, and zip ties. When the holidays end, you will have everything you need to customize your plastic bins and pack away your decor safely and efficiently.
Labeled Bins & Wreath Bags

Source: Pinterest
This setup pairs clearly labeled plastic bins with specialized, dust-proof wreath bags, demonstrating a comprehensive approach to holiday organization. The labels make finding specific items effortless, while the wreath bags protect bulky, awkwardly shaped items that won’t fit in standard totes.
Combining hard plastic bins for fragile items with soft, zippered bags for textiles and greenery is the hallmark of a professional-level storage system. It ensures that every piece of your collection has a dedicated, appropriate home that protects its specific material and shape.
Use a label maker with waterproof tape to create clean, uniform labels for your bins. Categorize by room (e.g., “Living Room Tree,” “Front Porch”) or by item type (e.g., “Ribbons & Bows,” “Ornaments – Gold”) to make the unpacking process just as smooth as the packing process.
Ultimate Attic Storage Guide

Source: New Trendsetter
This image illustrates a well-organized attic space where holiday decorations are stored in uniform bins, keeping the area clutter-free and navigable. Proper attic storage requires maximizing awkward angles and ensuring bins are protected from extreme temperature shifts.
Attics can become incredibly hot in the summer and freezing in the winter. While plastic bins protect against dust and pests, it is important to avoid storing temperature-sensitive items like candles, wax figures, or certain types of glue in the attic, as they can melt or warp beyond repair.
Create a dedicated “holiday zone” in your attic by installing heavy-duty wire shelving. Keeping your Rubbermaid bins off the floor protects them from potential water leaks or condensation, and makes it much easier to sweep and maintain the attic space year-round.
Store Ornaments Like a Pro

Source: Fancy Bloom
This visual highlights expert packing techniques, showing how to layer and protect ornaments within a bin to mimic professional moving and storage standards. The focus is on minimizing movement and providing ample cushioning for fragile glass and ceramics.
Professional organizers know that the key to safe storage is eliminating “dead air” or empty space inside the bin. If ornaments have room to roll, they will eventually collide and break. Use crumpled packing paper, bubble wrap, or even clean, dry towels to fill any gaps between your dividers.
Consider wrapping your most precious heirloom ornaments in unprinted newsprint or acid-free tissue, and then placing them inside a hard plastic cup or a small cardboard box before placing them in the main storage tote for double-layer protection.
Beautiful DIY Bin Organization

Source: Beautiful Lovely Things
This crafty setup demonstrates a beautiful, personalized approach to DIY bin organization, utilizing upcycled materials and careful arrangement to create a functional and aesthetically pleasing storage solution. It proves that practical storage can still look lovely.
Adding personal touches to your storage bins, like using decorative scrapbook paper to line the bottom of the tote or using festive ribbon to tie bundles of ornaments together, makes the post-holiday cleanup feel more like a creative project than a tedious chore.
If you enjoy crafting, spend an evening cutting custom dividers out of thick, decorative cardstock or foam board. Not only will they protect your ornaments, but they will also bring a smile to your face every time you open the bin next December.
Stackable Tray Systems

Source: Pinterest
This image showcases a multi-level storage system using stackable trays that fit perfectly inside a larger plastic bin. This method allows you to utilize the vertical space within a deep tote without risking the crushing of the ornaments on the bottom layer.
Stackable trays are an excellent investment if you have a large collection and limited shelf space. They allow you to pack a high volume of ornaments into a single footprint, and the trays can be lifted out individually, making it easy to access specific pieces without unpacking the entire bin.
You can mimic this system on a budget by using shallow, sturdy cardboard boxes (like those from luxury purchases or shoe boxes) stacked inside your main Rubbermaid tote. Just ensure the boxes are rigid enough to support the weight of the layer above them.
Secure & Simple Packing

Source: Jolly Festive
This visual focuses on the importance of secure packing, showing decorations nestled tightly and safely within a bin to prevent shifting during transit. Whether you are moving houses or just carrying the bin down a flight of stairs to the basement, secure packing is essential.
The golden rule of secure packing is that nothing should move when you gently shake the bin. If you hear clinking or sliding, you need to add more filler material like packing peanuts, crumpled paper, or soft textiles to lock the items firmly in place.
Always ensure the lid of your Rubbermaid bin snaps shut securely on all sides. For added peace of mind, especially if the bin will be transported in a vehicle, run a strip of heavy-duty packing tape around the seam where the lid meets the base.
Tips & Tricks from a Pro

Source: Jennifer Perkins
This image highlights professional strategies for sorting decorations, emphasizing the benefits of grouping items not just by type, but by color palette and theme. This level of organization transforms the unpacking process into a seamless, enjoyable experience.
Sorting by theme (e.g., “Nutcracker & Vintage,” “Woodland & Pine,” “Modern Metallic”) is incredibly helpful if you like to redecorate your tree in different styles from year to year. You can easily pull just one or two themed bins to create a fresh look without having to sift through your entire collection.
Use colored bin clips or colored sharpies to mark the edges of your bins according to their theme or color palette. This creates a quick visual code that allows you to grab exactly what you need at a glance, even in dimly lit storage areas.
Free Printable Bin Labels

Source: Nina Hendrick
This image showcases the use of beautifully designed, free printable bin labels that clearly identify the contents of each storage tote. Good labeling is the cornerstone of any successful long-term storage system, ensuring that your hard work packing the bins pays off next year.
Printable labels offer a polished, uniform look that elevates your storage area from a chaotic garage corner to a well-managed inventory system. They also allow you to include detailed sub-categories, like “Outdoor Lights – Roofline” or “Tree – Skirt & Collar.”
Print your labels on heavy cardstock or use weatherproof sticker paper so they won’t peel off or fade in damp garage conditions. Apply them to both the long and short sides of the bin to ensure readability no matter how the bins are stacked or turned on the shelf.
Simple Organisation for Garlands

Source: Pinterest
This visual demonstrates a simple, effective method for storing long, awkward items like garlands, ribbons, and tinsel without them turning into a tangled nightmare. Keeping textiles organized is just as important as protecting fragile glass ornaments.
Tangled garlands are one of the most frustrating aspects of holiday decorating. By wrapping them around pieces of cardboard, using paper towel tubes, or coiling them neatly into large zip-top bags, you ensure that they are ready to drape beautifully the moment you pull them out of the bin.
Dedicate one specific, shallow Rubbermaid bin solely to “Soft Goods” like garlands, tree skirts, stockings, and ribbons. Keeping these items separate from your heavy ornaments prevents the textiles from getting crushed or snagged on sharp hooks and wires.
7 Tips for Organized Storage

Source: Grace In My Space
This graphic outlines essential tips for maintaining an organized storage system, emphasizing the importance of decluttering before you pack. A successful storage system starts with evaluating what you actually love and use, rather than blindly packing away broken or unwanted items.
Before you place a single ornament into a Rubbermaid bin, do a quick audit. Toss broken glass, untangle and discard frayed light strings, and donate decor that no longer fits your style. This ensures that your storage bins are filled only with items that bring you joy and are in good working condition.
Implement a “one in, one out” rule for your holiday decor. If you buy a beautiful new set of ornaments this year, consider donating an older set that you rarely use. This prevents your storage collection from slowly expanding beyond the capacity of your bins and shelves.
The Painless Packing Method

Source: Organizing Moms
This approach focuses on making the packing process as painless and efficient as possible, often involving the whole family in the cleanup effort. When the system is simple and intuitive, even kids can help sort and pack the holiday decor safely.
Create “packing stations” with clear instructions. Set up one table for wrapping fragile items, one for sorting lights, and one for organizing the plastic bins. Having a dedicated workflow prevents the chaos of everyone trying to pack everything at once in the middle of the living room floor.
Make the cleanup fun by playing holiday music, serving hot cocoa, and turning it into a family tradition. When the process is enjoyable and the storage system is easy to understand, the post-holiday blues are significantly reduced.
Secrets to Long-Term Success

Source: Jennifer Perkins
This visual delves into the secrets of long-term storage success, focusing on archival-quality practices that protect holiday heirlooms for decades. It highlights the importance of using the right materials to prevent degradation over time.
For true heirloom pieces, avoid standard plastic bags or newspaper, which can trap moisture and cause ink transfer or mold. Instead, invest in acid-free boxes, unbuffered tissue paper, and breathable cotton storage bags to ensure your most precious items survive for the next generation.
Keep a master inventory list or a digital photo album of your holiday decor on your phone. This is especially useful for large collections, allowing you to remember exactly what you have without having to physically open every single Rubbermaid bin in the garage.
40 Best Storage Solutions

Source: The Lived-in Look
This final image represents a master guide to holiday storage, showcasing a wide variety of solutions ranging from heavy-duty totes to specialized wreath containers and light reels. It serves as a reminder that there is a perfect storage solution for every single piece of holiday decor you own.
Building a comprehensive storage system takes time, but the payoff is immense. When every item has a dedicated, protective home, the stress of the holidays is replaced with the joy of decorating, knowing that your beautiful collection is safe, organized, and ready to shine.
Start small if you are feeling overwhelmed. Focus on organizing just your ornaments this year using the plastic cup hack, and tackle the lights and garlands next year. Slowly building your ultimate Rubbermaid storage system ensures it is sustainable and perfectly tailored to your needs.
Love these ideas? Follow @theclutteredblog on Pinterest for more cozy, practical gift inspiration!