


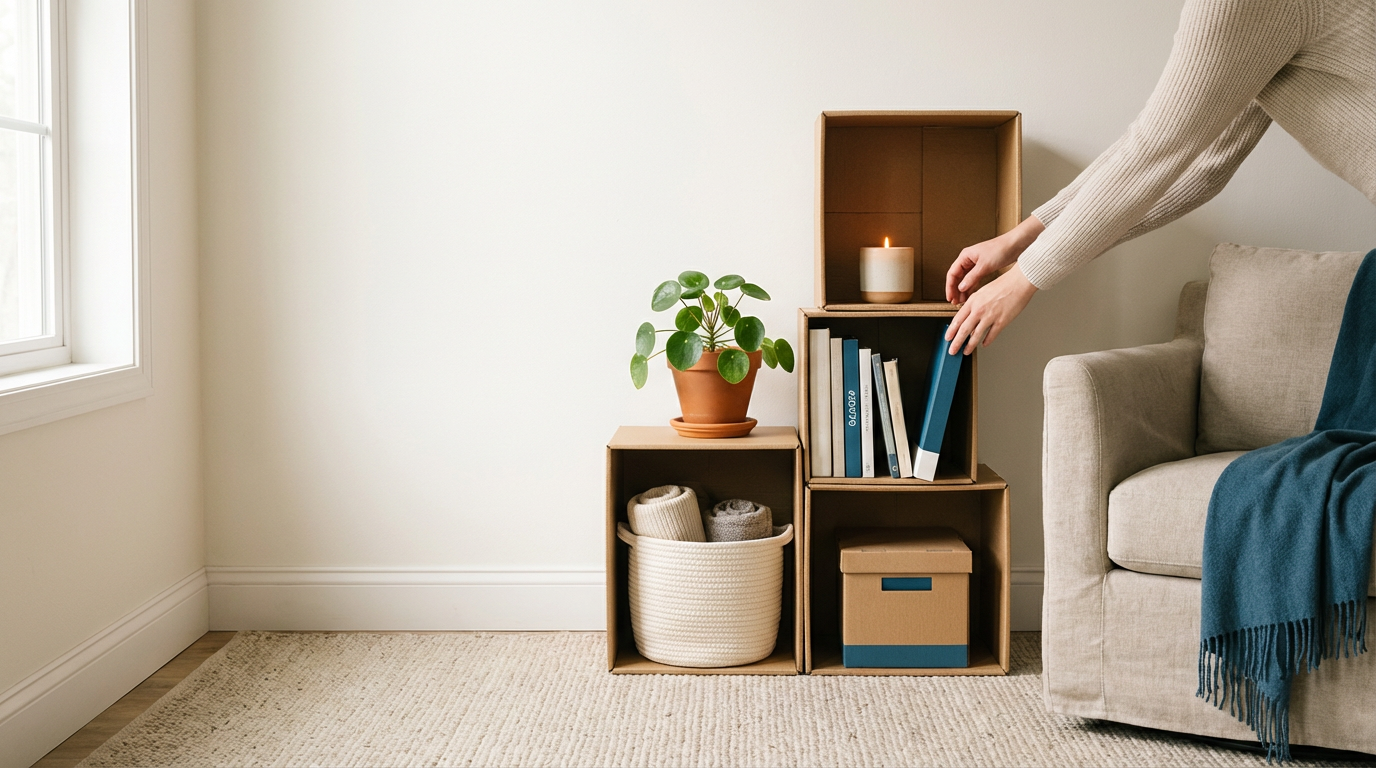


If you’ve been eyeing all those dreamy storage hacks on Pinterest but your budget says “nope”, DIY cardboard box shelves might be your new best friend. Think cozy, custom shelving made from boxes you already have, from a tiny cardboard bookcase to a full-on closet organizer. They’re perfect if you’re in a small apartment, dorm room, or just trying to tame the chaos in your kids’ room without spending a ton. In this guide, we’ll walk through how to build strong cardboard shelves, how to make them cute enough to display, and easy ideas for every corner of your home—books, shoes, crafts, even kitchen and closet storage. Take what you need, skip what you don’t, and feel free to save this post and follow @theclutteredblog on Pinterest so you can come back whenever you’re ready to build.

Why DIY Cardboard Box Shelves Actually Make Sense
DIY cardboard box shelves sound a little “middle-school project” at first, but they’re secretly kind of genius for real-life homes. They’re cheap, surprisingly strong when layered and reinforced, and super customizable for weird corners and tiny spaces. Plus, because you’re working with boxes, you can play with depth, height, and shapes that store-bought shelves just don’t offer.
This guide is especially helpful if you:
- Live in a small apartment, dorm, or shared house and need flexible, renter-friendly storage
- Want cheap DIY shelving with cardboard for books, shoes, crafts, or pantry items
- Love the idea of cardboard storage shelves you can paint, cover, or swap out when your style changes
By the end, you’ll know how to build strong layered cardboard shelves, which designs work best for different rooms, and how to turn simple boxes into cute, cozy storage that looks way more “Pinterest” than “moving day”.
Types of DIY Cardboard Shelves You Can Make
Before we get into the how-to, it helps to think about the different styles of shelves you can create with cardboard boxes. Each style fits a different need, so you can mix and match based on your space.
- Wall-mounted cardboard box shelves: Shallow boxes (or cut-down boxes) fixed flat to the wall for books, decor, or small plants.
- Floating shelf from cardboard: Hidden-support look using layered cardboard and a wall bracket or L-brackets, perfect for light decor.
- Layered cardboard shelves: Multi-layer stacked cardboard panels to create strong shelves for heavier items like books or shoes.
- Corner cardboard shelves: Triangle or pie-shaped shelves that tuck into unused corners in bedrooms, closets, or entryways.
- Hanging cardboard shelves: Shelves suspended with rope or macrame cord from a hook, great for plants, stationery, or skincare.
- Cardboard shelf with door: Box shelves with a flap or hinged door for hidden storage in closets or kids’ rooms.
Once you see the basic structures, it becomes way easier to adapt them into a cardboard shoe rack DIY, a mini bookcase, or a compact kitchen shelf organizer.
Step-by-Step: How to Build Strong Cardboard Shelves
Let’s walk through a simple, sturdy method you can adapt for almost any DIY cardboard shelf project, from a small bookcase to a shoe rack. We’ll focus on layering for strength so your cardboard isn’t sagging after a week.
1. Plan Your Shelf and Measure
Start with one zone you want to fix—maybe a small cardboard bookcase next to your bed, a cardboard shoe storage shelf near the door, or a craft storage organizer by your desk. Measure:
- Width of the space
- Height you’d like (how many shelves?)
- Depth (how far you want it to stick out)
Keep in mind: cardboard storage shelves do best with shallow depth (8–10 inches for books, 10–12 inches for shoes or bins) so they don’t bow under weight.
2. Choose and Prep Your Cardboard
Look for double-wall or thick shipping boxes if you want strong cardboard shelves. If you only have thinner boxes, you can still build strong shelves by layering multiple pieces together. Cut away taped or crumpled edges so you’re working with clean, flat panels.
For any cardboard bookcase DIY or shoe rack project, always cut pieces with the corrugation running front to back for more strength. You can stack 2–4 layers for each shelf panel, gluing them together and pressing under heavy books until dry. That “laminated” panel becomes your main shelf surface.
3. Build the Frame (Sides, Back, and Shelves)
The basic structure for DIY storage shelves from cardboard boxes looks like a mini bookcase: two sides, a back, and horizontal shelves.
- Cut two tall side panels the height you want your unit to be.
- Cut a back panel that matches the total width and height.
- Cut your layered shelf panels to the width and depth you decided earlier.
Glue or hot-glue the shelves to the side panels first, marking where each shelf should go. Then attach that structure to the back panel for extra stability. For a cardboard closet organizer or kitchen shelf organizer, you can add vertical dividers between shelves to create cubbies for baskets or folded clothes.
4. Reinforce for Strength
This is where the “strong cardboard shelves” magic happens. In addition to layering the shelves, reinforce:
- Edges: Add strips of cardboard along the front edge of each shelf like a little beam.
- Corners: Glue extra triangular pieces inside corners to stop wobbling.
- Wall: For tall units (especially cardboard bookcases), use removable wall anchors or Command-style strips to secure the back to the wall.
If you’re making wall-mounted cardboard box shelves or a floating shelf from cardboard, add extra layered supports under the shelf (like brackets made from folded cardboard) and always test with lightweight items first.
5. Finish and Decorate
Once your cardboard storage shelf feels sturdy, it’s time to make it cute. You can:
- Wrap each panel in kraft paper, contact paper, or leftover gift wrap
- Paint with acrylic paint, then seal with a clear coat for durability
- Add washi tape or fabric on the edges for a cozy, finished look
For a cardboard shelf with door, cut a separate front panel, attach with fabric or paper “hinges”, and add a simple loop or ribbon handle. This works beautifully in a cardboard closet organizer or a craft storage organizer where you want to hide visual clutter.
Room-by-Room Ideas for Cardboard Box Shelves
Once you know the basics, you can apply the same techniques in almost every room. Here are some ways to use cheap DIY shelving with cardboard throughout a small home.
Bedroom and Reading Nooks
- Cardboard bookcase / mini bookcase: Slim, vertical shelves beside your bed for books, candles, and a small lamp.
- Floating cardboard shelves: A couple of shallow shelves above the bed for frames, plants, or a sound machine.
- Corner cardboard shelves: Triangular units that turn an awkward corner into a cozy, decorated spot for books or decor.
Entryway and Shoe Storage
- Cardboard shoe rack DIY: Layered shelves that only hold 1–2 pairs per row so each shelf stays light and strong.
- Cardboard shoe storage shelves with doors: Closed boxes for shoes you don’t wear daily, stacked like cubes.
- Wall-mounted cardboard box shelves near the door: Mini shelves for keys, mail, and sunglasses.
Closet and Wardrobe
- Cardboard closet organizer: Vertical cubbies for sweaters, jeans, or bags, hanging from your closet rod or resting on the floor.
- Hanging cardboard shelves: Lightweight shelves suspended from the rod with rope or macrame-style cord, perfect for accessories.
- Cardboard shelf with door: Little cabinet-style units for socks, underwear, or seasonal items.
Kitchen and Pantry
- Cardboard kitchen shelf organizer: Layered, low shelves to corral spices, canned goods, or snack bins inside cabinets.
- Corner cardboard shelves on a counter: A small tiered shelf for mugs, tea, or coffee supplies.
- Wall-mounted cardboard box shelves for lightweight pantry items: Labeled boxes for snacks, tea bags, or baking tools.
Craft, Office, and Kids’ Spaces
- Cardboard craft storage organizer: Grid shelves for yarn, paints, markers, and paper.
- Cardboard storage shelf under a desk: Slim shelves for notebooks, tech, and files.
- Cardboard bookshelf DIY for kids: Low, forward-facing book display with shallow shelves so covers are visible.
Practical Checklist: Make Your Cardboard Shelves Last
Use this quick checklist while you build so your cardboard box shelves stay sturdy and cute over time.

- Choose thick or double-wall cardboard for all main panels.
- Layer 2–4 pieces of cardboard for each shelf, glued and pressed flat.
- Run the corrugation front-to-back on shelves for maximum strength.
- Keep shelf depth shallow (8–12 inches) to prevent sagging.
- Add front-edge strips to each shelf like a mini beam.
- Glue shelves to both side panels and a solid back panel.
- Use extra cardboard triangles inside corners for stability.
- Seal raw edges with tape or paper before painting.
- Avoid heavy items like stacks of big textbooks or dumbbells.
- Test wall-mounted or hanging shelves with very light items first.
- Secure tall cardboard bookcases to the wall with removable anchors.
- Keep cardboard shoes racks off damp floors with small feet or blocks.
- Line shelves with paper or thin foam if you’re storing clothes or fabric.
- Label each cubby so everything has a “home” and clutter stays controlled.
- Check shelves every few months and reinforce any areas that start to bow.
Practical DIY Cardboard Box Shelves Ideas for Real Life
Ready to see how all of this looks in daily life? Use these ideas as a menu and pick one project that feels doable this week.
- Wall-Mounted Cardboard Box Shelves for Books
Create a grid of shallow, square shelves above your bed or desk, each made from one box with the back removed and edges reinforced. Stack light paperbacks, candles, or tiny plants to get that cozy Pinterest-book-wall vibe without drilling heavy wood into your rental walls. - Cardboard Bookshelf DIY for Kids’ Rooms
Make a low, three-shelf cardboard bookcase with wider shelves and a solid back, then paint it in fun colors or cover it with patterned contact paper. Kids can see and reach their books easily, and you don’t have to stress about them bumping into heavy furniture. - Cheap DIY Shelving With Cardboard for Dorms
Turn three or four sturdy boxes on their sides and stack them vertically as cubbies for notebooks, snacks, and decor. Connect each box with glued joints and layered top panels to stop shifting, and you’ll get extra storage in your tiny dorm without buying furniture. - Cardboard Shoe Rack DIY for Entryways
Cut layered shelves just deep enough for one row of shoes, then add side panels and a top so it doubles as a mini bench or drop zone. You can create separate cubbies for each person’s shoes and finally stop tripping over sneakers at the door. - Cardboard Shoe Storage Shelves Inside a Closet
Instead of one big unit, build several slim, standalone shoe shelves that slide into your closet like bookends. This makes it easy to pull out a whole section to clean the floor or rearrange your setup when seasons change. - Cardboard Closet Organizer With Cubbies
Design a tall, narrow organizer with multiple square compartments for sweaters, jeans, bags, and accessories. Reinforce the vertical dividers and line each cubby with fabric or paper for a softer, boutique-style feel. - Cardboard Kitchen Shelf Organizer for Spices
Create a tiered shelf that sits inside a cabinet or on a countertop, with each level made of layered cardboard panels. Label each row for spices, teas, or baking essentials so you can see everything at a glance instead of digging through a cluttered shelf. - Cardboard Craft Storage Organizer for Supplies
Build a grid of small cubbies for markers, washi tape, paint bottles, and stickers, all from cut-down boxes. Add a cardboard door or sliding panel on one section so you can quickly hide messy bits when you’re not crafting. - Wall-Mounted Cardboard Box Shelves for Plants
Use small, reinforced boxes as wall-mounted “plant ledges” for very lightweight faux plants or tiny real ones. Seal and paint the cardboard, then pair it with neutral decor for a calm, modern look. - Corner Cardboard Shelves for Awkward Spaces
Turn triangle-shaped shelves into a vertical corner unit in your living room or bedroom. Store decor, books, or storage bins, and suddenly that weird empty corner becomes a warm, functional focal point. - Hanging Cardboard Shelves for Skincare or Jewelry
Create narrow shelves suspended from rope or macrame cord attached to a wall hook. Use them for skincare, jewelry, or perfumes in a bathroom or bedroom, keeping everything easy to reach but off your crowded counter. - Floating Shelf From Cardboard for Light Decor
Build a layered cardboard panel that slips over a simple wall bracket, then paint it to mimic wood or stone. This works best for displaying light decor—think framed photos, tiny plants, or a small speaker. - Layered Cardboard Shelves for Heavy Books
For stronger cardboard bookcases, double or triple the layers in each shelf and add vertical supports in the middle. Use these for paperback-heavy shelves in a home office or reading nook where you need more capacity but still want a DIY option. - Cardboard Shelf With Door for Hidden Storage
Turn a cardboard box on its side, add internal shelves, and attach a door panel with fabric or tape hinges. This makes a great mini cabinet for underwear, socks, craft supplies, or anything you don’t want visually out in the open. - Cardboard Closet Organizer for Accessories
Build a small organizer with shallow drawers or pull-out trays made from smaller boxes. Use it for scarves, belts, hats, or jewelry in your closet, and label each drawer so you can find things quickly during busy mornings. - Cardboard Kitchen Shelf Organizer for Pantry Bins
Create a two- or three-tier shelf that fits exactly into one pantry shelf, built to match the depth of your storage bins. This lets you stack bins while still being able to slide them out individually instead of piling everything on top of each other. - Cardboard Craft Storage Organizer for Kids’ Art
Use several shoebox-sized compartments with doors or open fronts for crayons, paints, and paper. Decorate it with stickers or doodles and let kids “shop” their own art supplies when it’s craft time. - Strong Cardboard Shelves for Utility Closets
Reinforce a basic shelf unit with extra layered panels and vertical supports to store light cleaning supplies, paper towels, or toilet paper. It’s an affordable solution for a rental utility closet you don’t want to invest heavy furniture into. - Hanging Cardboard Shelves Over a Desk
Suspend slim, layered shelves from hooks above your desk for planners, notebooks, and pen cups. This creates a mini “command center” while keeping your desktop clear and calm. - Floating Shelf From Cardboard in a Kid’s Room
Create a playful, shaped floating shelf (like a cloud, house, or heart) from layered cardboard and mount it with hidden supports. Use it for a few favorite toys or stuffed animals as a sweet, lightweight display.

FAQs About DIY Cardboard Box Shelves
How long do DIY cardboard shelves actually last?
If you build strong layered cardboard shelves and avoid overloading them, they can last surprisingly long—often months to years in normal home use. The key is to keep them away from moisture, use multiple layers for each shelf, and store only lightweight to medium-weight items. Over time, you can reinforce any sagging areas by adding new layers or supports instead of rebuilding from scratch.
Are cardboard shelves worth it on low-energy days?
Absolutely—you don’t have to build a full cardboard storage shelf in one sitting. On low-energy days, you can just measure and cut pieces, or glue one shelf layer and call it done. Breaking the project into small, doable steps makes it feel more like a cozy craft night than a big home project, and you still end up with a useful cardboard box shelf when you’re ready.
How do I stay consistent with using and maintaining them?
The easiest way to stay consistent is to give every item a clear “home” on your cardboard shelves and label the cubbies or boxes. When you set up a cardboard closet organizer or craft storage organizer, make it super obvious where things go back, and do quick two-minute resets at the end of the day. Because the shelves are light and flexible, you can also tweak the layout as your routines change, instead of feeling stuck with a permanent piece of furniture.
Do DIY cardboard box shelves work in really small spaces?
They’re especially good in small spaces because you can custom-fit them to weird corners and shallow walls. For example, a floating shelf from cardboard can be only 4–6 inches deep, just enough for decor or small books, while a corner cardboard shelf can tuck into space that normally gets wasted. You can also stack cardboard shoe storage shelves vertically to use height instead of floor area.
How do I avoid feeling overwhelmed by the project?
Start with one tiny project, like a mini cardboard bookshelf DIY for your nightstand or a single hanging cardboard shelf above your desk. Gather your boxes, pick one design, and follow a simple checklist instead of trying to build a whole cardboard closet organizer in a weekend. Let it be imperfect and a bit crafty—this is supposed to be budget-friendly, low-pressure storage, not a design competition.
Ready to Try Your First DIY Cardboard Box Shelves?
If you’ve made it this far, you already have more than enough ideas to turn a few boxes into shelves that make your home feel calmer and more put-together. Start with one easy project—a tiny cardboard shoe rack DIY or a mini bookcase by your bed—and let yourself learn as you go. Save this post for later, and follow @theclutteredblog on Pinterest for more cozy, budget-friendly organizing ideas you can actually see yourself using.
Now that you’ve got the full how-to and a bunch of DIY cardboard shelves ideas, let’s dive into some real-life Pinterest inspiration. Below is a curated visual roundup using original Pins so you can see how other people turn simple boxes into surprisingly beautiful storage. Use it like a menu: pick one or two ideas that feel doable, adapt them to your space, and save your favorites to your own boards so you can come back when you’re ready to craft.
Use this listicle when you need a quick visual nudge instead of rereading the whole guide—perfect for Sunday reset sessions, study breaks, or those random creative bursts when you suddenly feel like reorganizing your room.

Cozy DIY Cardboard Box Shelves Ideas
These DIY cardboard box shelves ideas are pulled straight from real Pinterest projects, so you can see what actually works in tiny apartments, dorm rooms, and cozy family homes.
Scroll through, pick a couple of favorites that match your space and energy level, then click through to the original Pins for full tutorials and save them to your own boards for later.
Turn Cardboard Into a Tiny Desk Bookshelf

This idea turns simple cardboard into a tiny bookshelf that sits right on your desk, with compartments sized for notebooks, pens, and decorative bits.
The slim profile is perfect if you’re short on surface space but still want your essentials within arm’s reach.
Copy the layout, then customize the colors or labels to fit your own study or work-from-home vibe.
Build a Cardboard Box Cabinet-Style Shelf

This tall cardboard shelving cabinet shows how far you can push DIY storage shelves from cardboard boxes when you layer and reinforce them well.
The multiple cubbies make it great for mixed storage—books, baskets, decor, and folded clothes all in one place.
Use this as inspiration for a statement piece in a bedroom or living room where you’d usually splurge on expensive shelving.
Create Strong Layered Corner Cardboard Shelves

This project uses layered cardboard panels to create corner shelves that feel surprisingly solid and sculptural.
The wraparound design makes a forgotten corner useful without taking up extra floor space.
Try a smaller version first, then build up to a full-height corner unit once you’re comfortable with layering techniques.
DIY Cardboard Toolbox Shelf for Craft Supplies

This toolbox-style cardboard organizer doubles as a mini shelf system for paints, brushes, or small tools.
The handle makes it easy to move between rooms, which is ideal if your crafting space is temporary or shared.
Use this as a model for building portable cardboard craft storage that still looks neat on a shelf or desk.
Stack a Cardboard Desk Organizer Shelf

This idea stacks slim cardboard sections into a tiered desk organizer that almost feels like a mini shelf.
Because the compartments are shallow, nothing gets lost at the back of a drawer.
Adapt the same structure for makeup, skincare, or entryway catch-all storage.
Cardboard Box Shelves as Wall Decor

Here, cardboard box shelves become part of the wall art, with bold colors and playful shapes.
It’s a reminder that storage can feel fun and creative, not just practical.
Use this format in a kids’ room, craft room, or playful office corner where you want both function and personality.
DIY Wall-Mounted Cardboard Organizer Grid

This wall-mounted cardboard organizer combines open shelves with pockets, perfect for stationery or mail.
It uses vertical space instead of desk space, which is ideal in small apartments or dorms.
Borrow the grid layout and adapt the pocket sizes for your own daily essentials.
Cardboard Storage Rack for Books and Bins

This open storage rack shows how layered cardboard can handle everyday items like books, files, or small baskets.
The simple lines keep it from feeling cluttered, even when it’s full.
Use it in a hallway, office, or bedroom corner that needs extra storage without heavy furniture.
DIY Cardboard Shoe Rack for Small Entryways

This stacked cardboard shoe rack uses narrow shelves sized just right for a couple of pairs per tier.
It keeps the floor clear without visually overwhelming a small entryway.
Line the shelves with paper or thin mats if you’re worried about dirt or moisture.
Modular Cardboard Box Shelving Wall

This project stacks and clips cardboard boxes together to create a full shelving wall without heavy materials.
The modular design means you can rearrange or add boxes as your storage needs change.
It’s a great template if you want a big statement shelf but you’re working with a tiny budget.
Furniture-Look Cardboard Shelf Unit

This cardboard shelving unit is styled so well it could easily pass as a lightweight piece of furniture.
Neutral colors and clean lines make it easy to blend into a living room or bedroom.
Use it as proof that cardboard shelves can look grown-up, not just crafty.
Foldable Display-Style Cardboard Shelves

This foldable display stand shows how to turn cardboard into a portable, multi-shelf unit.
It’s great for markets, craft fairs, or temporary apartment setups where you move often.
Keep the structure in mind if you ever need shelves that can pack flat between uses.
Cardboard Book Shelves With Geometric Lines

This geometric cardboard shelving unit is designed specifically to hold books and decor in a studio-style space.
The open cubes keep everything feeling light even when the shelves are full.
Use this as inspiration if you want a statement bookshelf without the weight of real wood.
Closet-Friendly Cardboard Shoe and Clothes Shelves

Here, cardboard shelves are tucked neatly into a closet to divide space for shoes and folded items.
The modular sections make it easy to rearrange as your wardrobe changes.
It’s a low-commitment way to test closet organizer layouts before buying anything permanent.
Utility Room Shelves From Cardboard Boxes

This laundry-room-style idea uses cardboard shelving to store detergents, baskets, and cleaning supplies.
Since the items are lightweight, cardboard is more than strong enough here.
Just keep the shelves off the floor and away from splashes to make them last longer.
Tall Craft Storage Unit From Cardboard

This tall cardboard shelf is packed with craft supplies, showing how well the material works for light, colorful storage.
The mix of open shelves and bins keeps everything accessible but not visually chaotic.
Use it as a template for your own “craft tower” in a corner next to your desk or couch.
Full-Height Cardboard Bookcase

This tall cardboard bookshelf proves you can store a serious book collection without traditional wood shelves.
The design uses repeated vertical supports to keep everything stable.
It’s especially smart if you’re in a rental and don’t want to move heavy furniture every time you relocate.
Cardboard Display Shelf for Shoes and Decor

This display shelf uses cardboard boxes to show off shoes and favorite decor pieces like they’re in a boutique.
The open fronts keep everything easy to grab on busy mornings.
It’s perfect for teen rooms or closets where you want storage to feel fun and personal.
Cardboard Shoe Cabinet With Doors

This cardboard shoe cabinet hides visual clutter behind doors while still being lightweight and affordable.
The front panels make it look more like a real piece of furniture than a temporary fix.
Borrow the door idea for closets, entryways, or even kids’ toy storage.
Mini Drawer Shelf Unit From Cardboard

This mini drawer unit stacks small cardboard drawers into a shelf-style tower for tiny items.
It’s great for jewelry, office supplies, or sewing notions that usually get lost in larger bins.
Use the drawer concept to add hidden storage to any open shelf you already have.
Kitchen Cabinet Organizer From Cardboard

This project uses cardboard shelving inside a cabinet to split vertical space for dishes or pantry items.
It’s a smart way to test out shelf heights before investing in permanent risers.
Just add a liner or wipeable contact paper on top to make cleanup easier.
Dresser-Top Shelf Organizer With Cardboard

This dresser-top organizer adds shelf-style compartments for makeup, skincare, or jewelry without needing a full vanity.
The pastel palette keeps the look soft and calming.
It’s an easy first project if you want something quick and pretty for your bedroom.
Cardboard Niche Shelf for Pet or Decor

This niche-style shelf uses cardboard to frame a cozy little alcove with storage around it.
It’s perfect for pet beds, plants, or special decor pieces.
Think of it as a way to turn simple shelves into a focal point in a room.
Desk-Side Cardboard Bookshelf

This slim bookshelf fits perfectly next to a desk, with just enough depth for books and small decor.
The vertical format makes it ideal for tight office or study corners.
Try a shorter version first if you’re nervous about building a full-height unit.
Whimsical Giant Book Cardboard Bookcase

This bookcase is shaped like a giant book, turning basic cardboard into a playful statement piece.
It’s perfect for a kid’s reading corner or a whimsical home library wall.
Use it as permission to play with shapes instead of only building simple rectangles.
Recycled Cardboard Shelving Unit

This clean-lined shelving unit uses recycled cardboard in a way that feels modern and intentional.
The repeated shelves give plenty of space for bins, books, and decor.
It’s a great reference for a living room or office where you want your DIY to look polished.
Decorative Wall Shelves From Cardboard

This wall display uses simple cardboard shelves as an artful arrangement, not just pure storage.
It proves you can treat cardboard like a design element, especially with cohesive colors.
Try a smaller cluster over a desk or bed to test the look in your own space.
Eco-Friendly Cardboard Storage Unit

This storage unit shows how cardboard shelves can fit seamlessly into an entryway with baskets and everyday items.
The neutral tones help it blend with a variety of decor styles.
It’s ideal if you want a “for now” piece that still looks intentional and styled.
Sculptural Hexagon Cardboard Shelves

These hexagon shelves turn cardboard into a honeycomb-style wall feature for tiny plants and trinkets.
The shape alone makes the wall feel more designed and intentional.
Mix a few hexagons with simple rectangles if you want a softer, organic look.
Wardrobe-Style Cardboard Shelf Cabinet

This wardrobe-style cabinet uses cardboard to add both open shelves and closed storage in a single corner unit.
The doors make it easy to hide visual clutter while keeping everything close.
Copy this idea if you want a cardboard closet organizer that feels more like real furniture.
Love saving ideas like these? Follow us on Pinterest for more inspiration, templates, and easy-to-use resources.


