


If your current “recycling system” is a mystery bag in the corner that sometimes overflows and sometimes gets tossed in the trash, you’re not alone. Most home recycling station ideas fail because they’re inconvenient, confusing, or hidden in a place no one wants to walk to.


A kitchen recycling station that you’ll actually use needs three things: the right location, clear bins and labels, and super simple habits for rinsing and prepping items. This beginner‑friendly home recycling setup walks you through all three—without requiring a full pantry makeover or expensive containers.

Think of this as a small home upgrade that reduces trash, visual clutter, and decision fatigue every single day.
Step 1: Choose the Best Place for Your Home Recycling Station
The best place to put a home recycling station is where the recyclables are born: usually the kitchen, pantry, or an area right next to them. If you have to walk across the house or down to the garage every time you finish a yogurt cup, you’ll skip it.
Good layout options:
- Kitchen main zone: next to the trash can, near where you unpack groceries or prep food.
- Under sink recycling station setup: pull‑out bins or compact containers under the kitchen sink so everything is within arm’s reach.
- Pantry: a slim row of bins or crates along the floor or on a lower shelf.
- Garage or utility area: works well if it’s just one step from the kitchen door, especially for bigger containers or glass.
Small kitchen recycling station ideas:
- Use slim, tall bins that tuck between cabinets or next to the fridge.
- Hang a small container on the inside of a cabinet door for paper or plastic bags.
- Try an apartment recycling station for tiny spaces by stacking crates or using narrow rolling carts that slide beside appliances.
The rule of thumb: if you can’t toss something into the correct bin in 2–3 steps, the location is too inconvenient.
Step 2: Pick Bins and Organize Them So Your Brain Can Go on Autopilot
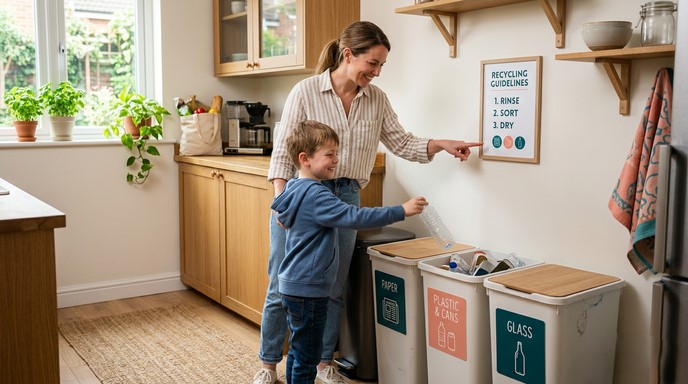
Once the location is set, choose containers that are easy to reach, easy to empty, and easy to understand at a glance. Labeled recycling bins for home are essential, especially if you have kids, guests, or a partner who “never remembers what goes where.”
Start with your local recycling rules: most programs separate at least paper/cardboard, plastic, metal, and sometimes glass. Match your home station to that.
Simple home recycling system for families:
- 3–4 labeled recycling bins for home:
- Paper & cardboard
- Plastic containers
- Metal cans
- Glass (if your area takes it separately)
- Color coded recycling bins for families with kids (for example: blue = paper, green = glass, yellow = plastic, gray = metal).
- A small, clearly different bin or caddy for non‑recyclable trash nearby so no one is tempted to toss everything together.
Low‑cost and diy recycling station options:
- Crates or baskets lined up in a row on the pantry floor.
- Sturdy cardboard boxes with simple printed labels taped to the front.
- A diy recycling station using crates, baskets, and boxes you already have, upgraded with clear labels and maybe a coat of paint.
Hidden recycling storage ideas:
- Pull‑out drawers or tilt‑out cabinets with divided bins.
- In‑cupboard or under‑sink pull‑out systems that separate trash, recycling, and compost.
- A slim cabinet with labeled bins inside, so the whole recycling center disappears behind one door.
If you live in an apartment, a small apartment recycling station for tiny spaces might be:
- Two stackable bins inside a pantry or closet (paper on top, mixed containers below).
- A narrow vertical cart with removable buckets for different materials.
The more you can make your bins match your daily flow, the less mental load recycling will feel like.
Step 3: Create Simple Rules So the System Actually Works
Even the most beautiful home recycling station ideas will fail if no one knows what belongs where or how to prep recyclables. This is where a simple recycling rules printable for the kitchen can save a lot of frustration.
Core habits for how to prep recyclables:
- Empty: pour out any leftover liquid and scrape off big food bits.
- Rinse: give containers a quick rinse in leftover dishwater if needed—your recyclables only need to be “clean‑ish,” not perfect.
- Dry: let items drip briefly or shake off water so paper and cardboard in the bin don’t get soggy.
- Flatten: break down cardboard boxes and flatten large cartons to save space and make bins easier to empty.
You can write (or print) simple rules like:
- “Empty, quick rinse, lids off, flatten boxes.”
- “No greasy pizza boxes, no plastic bags in this bin.”
Post your simple recycling rules printable at eye level near the kitchen recycling station that you’ll actually use. The goal is making it impossible to say, “I didn’t know.”
Step 4: Get Your Family to Actually Use the Recycling Station
The biggest question isn’t really how to set up a home recycling station that actually works—it’s how to get family to use the recycling station without constant nagging.
Try these practical tactics:
- Start with a walk‑through: show each family member the bins and explain what goes where in one minute.
- Use color coded recycling bins for families with kids so even non‑readers can follow the system.
- Turn it into a mini game: “Can you find anything in your lunchbox that goes in the blue bin?”
- Keep the lids easy: no heavy lids or complicated foot pedals that make it harder to recycle than to use the trash.
- Celebrate small wins: “Hey, I noticed you put your can in the recycling. That actually helps a lot.”
Common mistakes that make a home recycling station fail:
- Bins are too far from where you cook, snack, or unpack groceries.
- No clear labels, so everything ends up in the trash out of confusion.
- Overly complicated sorting requirements at home that don’t match your city’s rules.
- Bins are tiny and overflow constantly, which leads to frustration and “I’ll just throw it in the trash.”
A simple home recycling system for families is more about reducing friction than enforcing perfection.
Step 5: Add an Eco‑Friendly Angle Without Making Your Life Harder
Once your basic system is humming, you can slowly turn it into a more eco friendly home recycling station setup—without overwhelming yourself.
Eco and low waste upgrades:
- Add a small compost bin (countertop caddy or under‑sink bin) for food scraps if your city or garden allows composting.
- Keep reusable shopping bags or jars near the station so they’re easy to grab before a grocery run.
- Use organizing recycling to reduce trash and clutter: once recyclables have a home, you’ll notice your trash shrinking and your cabinets feeling calmer.
- Build a low cost recycling station using things you already have at home—repurposed baskets, jars for storing batteries, and a box for soft plastics (if there’s a drop‑off spot nearby).
This is your beginner friendly home recycling setup, not a zero‑waste competition. Add one eco tweak at a time, and stop when it starts feeling like too much.

Quick Setup Checklist: Home Recycling Station That Actually Works
Use this checklist as a plug‑and‑go plan to build or fix your system in an afternoon.
- Decide your main location: kitchen, pantry, under sink, or garage right off the kitchen.
- Choose containers that fit your space: slim bins, crates, boxes, or hidden pull‑out drawers.
- Match bins to your local rules: paper, plastic, glass, metal, plus trash and maybe compost.
- Label everything clearly: words + icons, and color coded recycling bins if you have kids.
- Create and post a simple recycling rules printable near the station.
- Teach your family the basics: quick tour, “empty, rinse, dry, flatten,” and what not to toss in.
- Set a routine for emptying bins (e.g., every trash day or when a specific container is full).
- Keep a small stash of reusable bags or boxes nearby for taking recyclables out.
- Add one eco upgrade if you have capacity: compost caddy, reusable containers, or a battery recycling jar.
- Review after 2–3 weeks: what’s working, what’s overflowing, and what can be simplified?
Once this is dialed in, your home recycling station ideas stop being “a system you’re trying” and start being “just how the kitchen works.” Less trash, fewer random piles, and a small daily habit that actually feels doable.
With a few intentional choices about location, bins, and simple rules, you can build a kitchen recycling station that you’ll actually use—even in a tiny apartment or busy family home. Start small, let the system evolve with you, and let it be “good enough” instead of perfect.

FAQ
FAQs About How to Set Up a Home Recycling Station That Actually Works
What if I don’t have time to overhaul my whole kitchen?
You don’t need a full makeover to create a simple home recycling system for families. Start by putting just one clearly labeled bin next to your existing trash can for the most common recyclable in your home (often paper or plastic containers). Once that habit sticks, you can add more bins or move to a more polished kitchen recycling station over time. Think of it as upgrading in phases, not doing everything in one weekend.
How can I do this when my energy is really low?
When your energy is low, aim for the easiest possible wins. For example, use two basic boxes under the sink—one for trash, one for mixed recycling—and add handwritten labels. Skip fancy containers for now; you can always swap them out later. Focus on the single habit of “if it’s a bottle, can, or box that’s mostly clean, it goes in the right bin.” The system can be ugly and still effective.
How do I keep the system consistent long term?
Consistency comes from routines, not motivation. Tie your recycling habits to existing rhythms, like emptying the bins every trash day or after your weekly grocery trip. Keep your simple recycling rules printable visible so no one has to remember everything. Every few months, do a quick check: are certain bins constantly overflowing or ignored? Adjust sizes, locations, or labels instead of blaming yourself or your family.
What if I live in a very small space or apartment?
An apartment recycling station for tiny spaces should be vertical, hidden, or multi‑use. Use stackable bins in a closet, narrow containers beside the fridge, or under sink recycling station setups with pull‑out bins that divide trash and recycling. If outdoor recycling bins are far away, keep a reusable bag hanging on a hook to carry recyclables out in one trip. The goal is zero extra steps beyond what you’re already doing.
How do I manage the mental load of remembering all the recycling rules?
You don’t have to memorize everything. Print your local guidelines, highlight the basics, and turn them into a 3–5 line simple recycling rules printable. Post it above your home recycling station and let that piece of paper carry the mental load. Over time, you’ll remember the key points, but until then, you can just point the kids (and yourself) to the sign instead of explaining from scratch every time.
Building this kind of system is all about small, sustainable tweaks, not eco‑perfection. Start with one bin, one rule, or one layout improvement, and let yourself celebrate that as a real step forward. Save this post so you can revisit the checklist when you’re ready for the next upgrade, and follow @theclutteredblog on Pinterest for more calm, clutter‑light home organization ideas.


