


Easy Memorial Day Recipes: Quick Patriotic Favorites
Fire up the grill with these no-fuss, red-white-and-blue dishes that taste like summer freedom.
Memorial Day weekend hits different when you’re juggling lawn games, family catch-ups, and that perfect playlist—but the last thing you need is spending hours in a hot kitchen. That’s where these easy Memorial Day recipes come in: simple, patriotic dishes that let you focus on what matters most.
Think bright strawberry salads, creamy coleslaw that chills while you grill, and flag-inspired desserts everyone fights over. These easy Memorial Day recipes for weeknights (or holiday weekends) use ingredients you probably already have, with patriotic flavors that scream summer cookout.
From grill-side starters to make-ahead sides and no-bake sweets, this collection delivers maximum flavor with minimum effort. Ready to make your Memorial Day unforgettable?
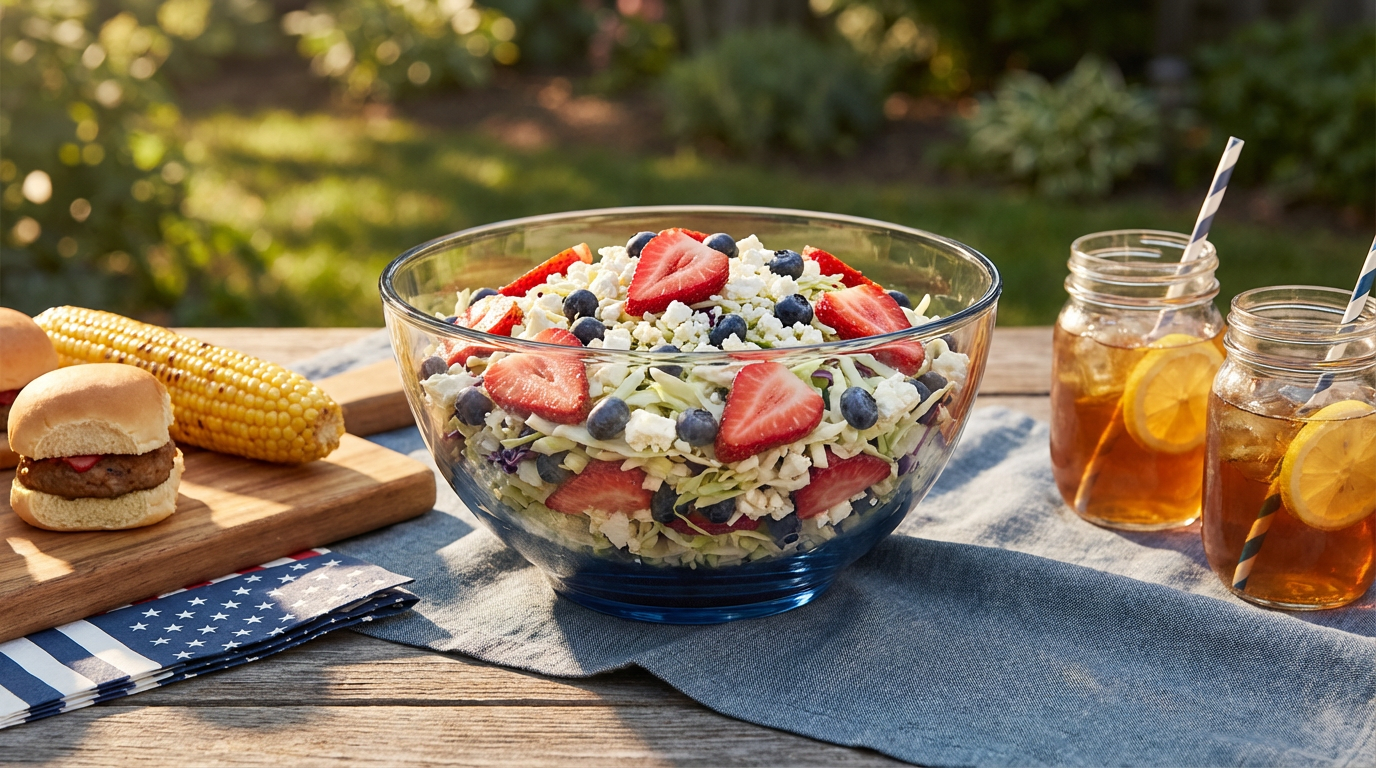
Featured: Patriotic Strawberry Coleslaw
The ultimate Memorial Day side—creamy, crunchy, and naturally red-white-and-blue.
Ingredients

Equipment

- Large mixing bowl
- Whisk
- Sharp knife & cutting board
- Measuring cups/spoons
- Serving bowl
Step-by-Step Instructions

Recipe Notes
- Make ahead: Prepare up to 4 hours in advance; dressing keeps cabbage crisp.
- Storage: Refrigerate in airtight container up to 2 days.
- Dairy-free: Swap feta for toasted nuts or seeds.
Nutrition Information
Approximate values per serving:
| Nutrient | Amount | % Daily Value* |
|---|---|---|
| Calories | 210 kcal | 11% |
| Total Fat | 16g | 21% |
| Saturated Fat | 3g | 15% |
| Carbohydrates | 16g | 6% |
| Protein | 3g | 6% |
| Sodium | 280mg | 12% |
*Percent Daily Values are estimated and based on a 2,000 calorie diet.
Key Tips for Success

- Use pre-shredded cabbage to save 10 minutes of knife work.
- Toss gently to keep strawberries whole and pretty.
- Make dressing first—let flavors meld while prepping produce.
- Chill briefly for best flavor marriage (but serve ASAP for max crunch).
Variations & Substitutions

- Vegan: Use vegan mayo + coconut yogurt instead of feta.
- Spicy: Add 1 tsp sriracha to dressing + jalapeño slices.
- Nutty: Swap feta for toasted pecans or sunflower seeds.
- Apple twist: Add 1 diced apple for crunch + sweetness.
Serving Ideas

This coleslaw shines as your Memorial Day MVP side dish. Pile it high next to smoky ribs, burgers, or grilled chicken for the perfect creamy-crunchy contrast.
- Scoop generously onto pulled pork sandwiches
- Serve family-style in a chilled glass bowl with serving spoon
- Stuff into lettuce wraps with grilled shrimp for low-carb option
- Top with crushed pretzels right before serving for extra crunch
Frequently Asked Questions
Can I make this ahead of time?
Absolutely! Prepare up to 4 hours ahead. The flavors actually improve after 30 minutes of chilling. Just don’t add delicate berries until ready to serve if you want maximum freshness.
Can I use bagged coleslaw mix?
Yes! Use a 14-16 oz bag of pre-shredded cabbage and carrots. Just taste before adding more cabbage if you prefer less carrot sweetness.
Is this coleslaw sweet or tangy?
Perfectly balanced! The honey adds gentle sweetness that complements the apple cider vinegar tang. Adjust honey down for more tang, up for sweeter profile.
How do I make it dairy-free?
Swap feta for toasted sunflower seeds, pumpkin seeds, or chopped toasted almonds. Vegan mayo + a splash of coconut yogurt keeps it creamy without dairy.
Can I double the recipe?
Definitely! Perfect for crowds. Use the same large mixing bowl and double everything. Make-ahead factor makes it ideal for serving 12+ hungry guests.
Ready to make your Memorial Day unforgettable? Save this recipe and Pin it for later!
Follow @theclutteredblog for more easy recipes that make hosting a breeze.


